
1. Create a template for your product landing page
Time required to perform this step: 5 minutes to 8 hours
A product page consists at a minimum a product title, product preview image, price, description and "add to cart" button. If you intend to offer real-time shipping quotes or compute shipping fees through the flat fee cart's weight option then a best practice is to display that weight on the product landing page as well. By default, you should also add the product options token so that the store manager can easily add colors, sizes, calendar or any number of options which may or may not modify items prices and weight to their catalog.
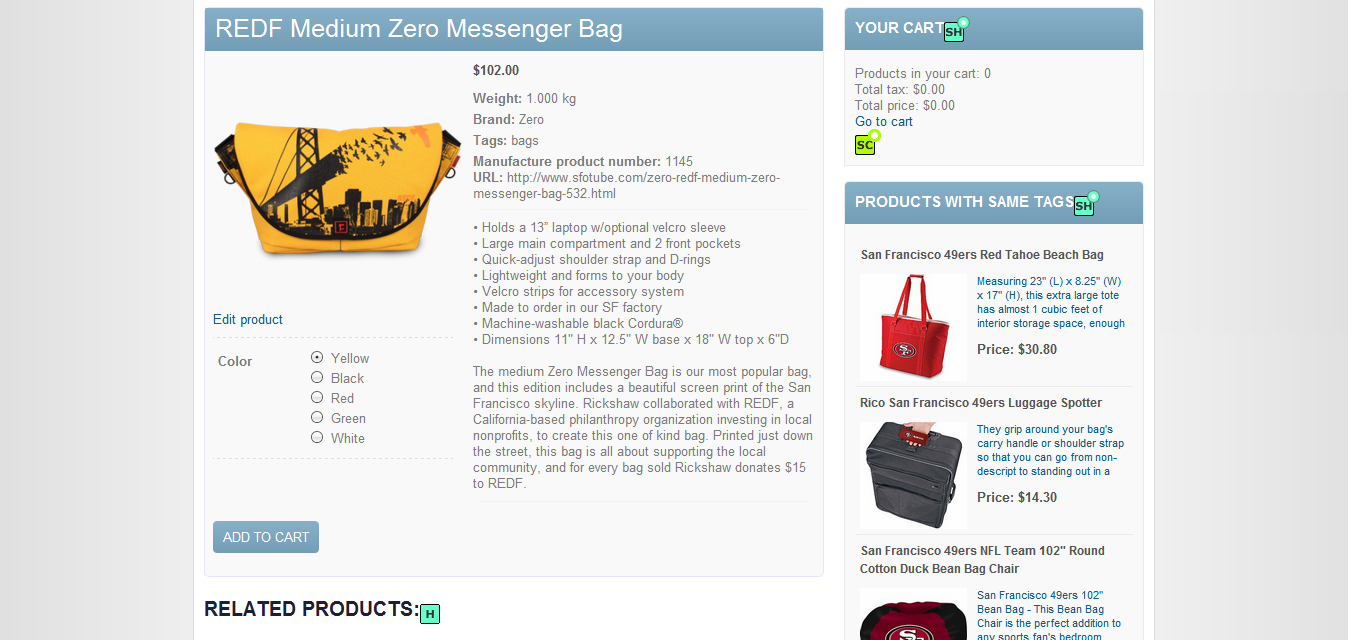
Optionally, related products or products using the same tags can also be made to appear easily on your product page. In addition, if you intend to offer price quotes through the built-in quote engine, you should add a quote form token to this page.
2. Create product listing templates
Time required to perform this step: 5 minutes to 3 hours
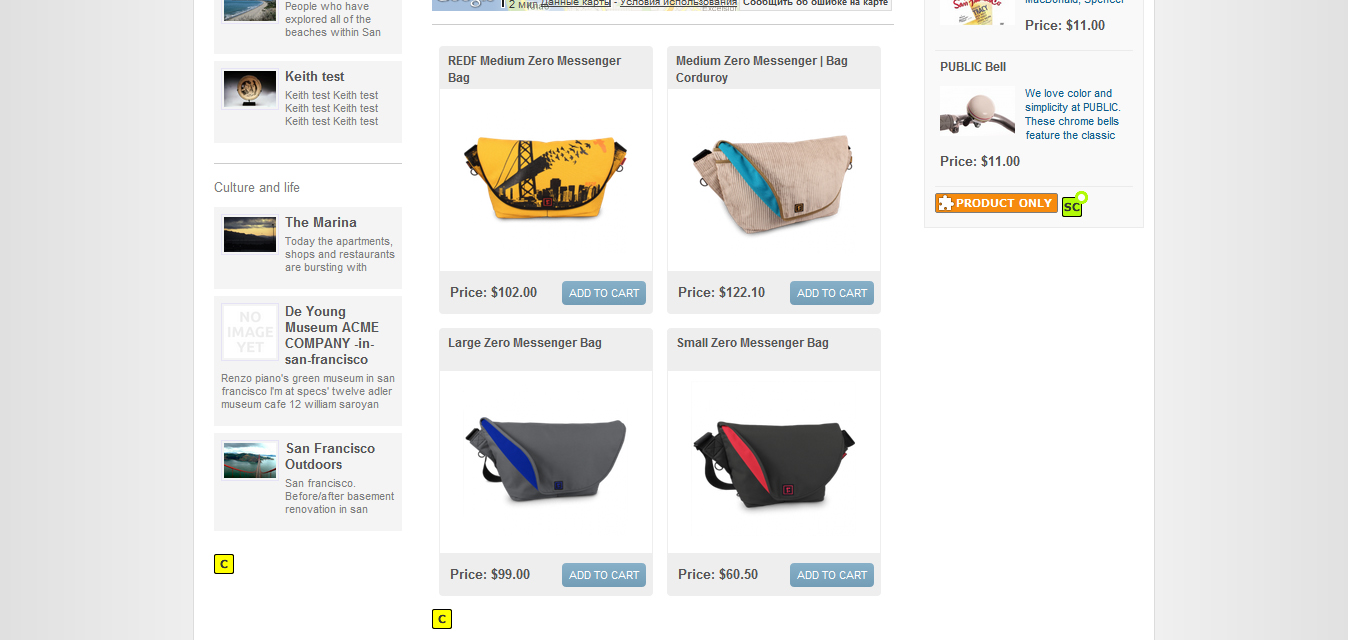
SeoToaster lets you react to changing market conditions in a few clicks without the help of a developer. Web merchants can add filtered product listings based on individual products, or product tags & brands combination. These product listings use pre-built templates to display your product selection. And because we like to keep things simple. when lists are based on products tags, these update automatically as your product catalog evolves (-> watch a video on product lists creation here).
Product listing templates use regular HTML alongside embedded product system tokens such as for product description, product preview image, product price, etc. However, in order to keep the list nicely readable and practical, try to keep the information to a minimum. For example, if a description is needed for product listing, consider inserting a short product description token there instead of a full product description token. Feel free to create as many lists as required for your project, and insert an "add to cart" token/button. Here is the simple example of what a product list looks like:
3. Create a great shopping cart checkout page template
Time required to perform this step: 30 minutes to 2 hours
The checkout page template should contain cart, summary information, shipping and payment system widgets. Just like for any other page template, your checkout page template can include any number of widgets, tokens, or even front-end editable content areas. Feel free to create any number of checkout templates as required to perform checkout page conversion tests for your web store.
And since you are preparing your checkout page template, it is a good time to clarify a couple of points at this stage. As you can see in screenshot #2 below, the checkout process offers existing customers the ability to log-in prior to completing their purchase. There is no way to "create" an account because the system does it automatically for your website visitors. Simply comment the DIV containing the "existing customer log-in" column out in your code if you wish to bypass this option altogether, and make sure to remove any action email trigger so that no email with credentials gets sent for first-time buyers.
Now is also a good time to think about your shipping policy (do you offer free shipping, how will you handle shipping charges? will you mark up shipping? do you let people pick their orders up at your storefront?) then go to the STORE/shipping config menu to download, install the appropriate real-time shipping gateway plugins. Pick also your payment gateway and consider offering free quotes as a checkout option (SeoToaster features a very comprehensive built-in web quoting software engine that is ideal for merchants also making sales over the phone). All shipping and payment plugin tokens are added to the default checkout template, and show up automatically when the plugin is found to be installed and operational on the system.
Here is an example of what the default checkout process looks like:
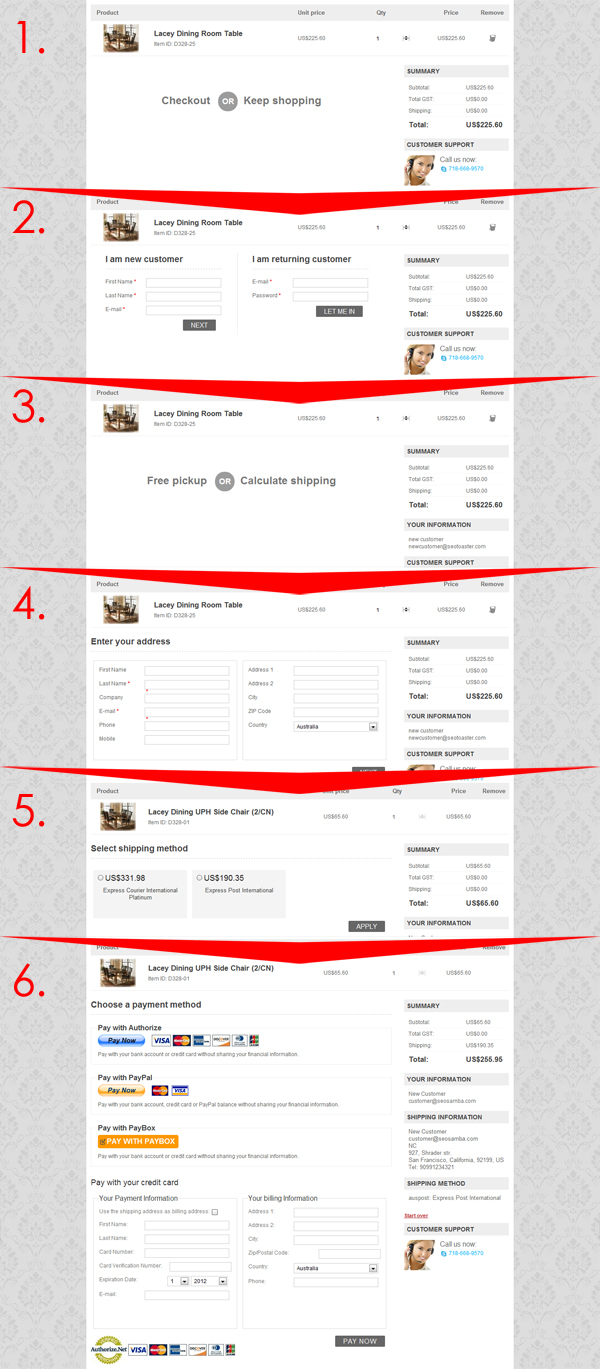
1. Checkout or keep shopping.
2. Log in if you’re existing customer or sign up if you’re buying here for the first time.
3. Choose the delivery service.
4. If you’re going to use delivery service, enter your shipping information.
5. Choose the delivery method.
6. Use one of the payment systems to place your order.
4. Create your actual web store checkout page
Time required to perform this step: 2 minutes
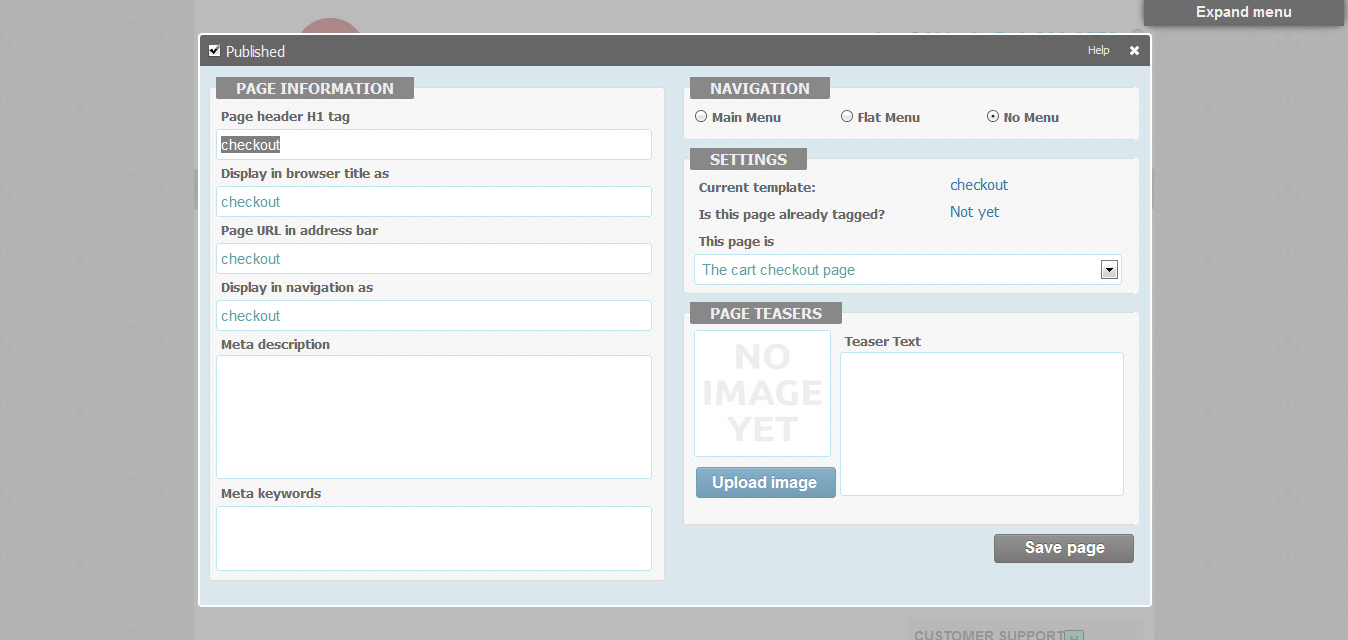
In the previous step, you created one or more checkout page templates. Now you need to create the actual checkout page, select the appropriate checkout page template, and then assign the "checkout page" role within the SETTINGS section of the add page or edit page properties menu tab.
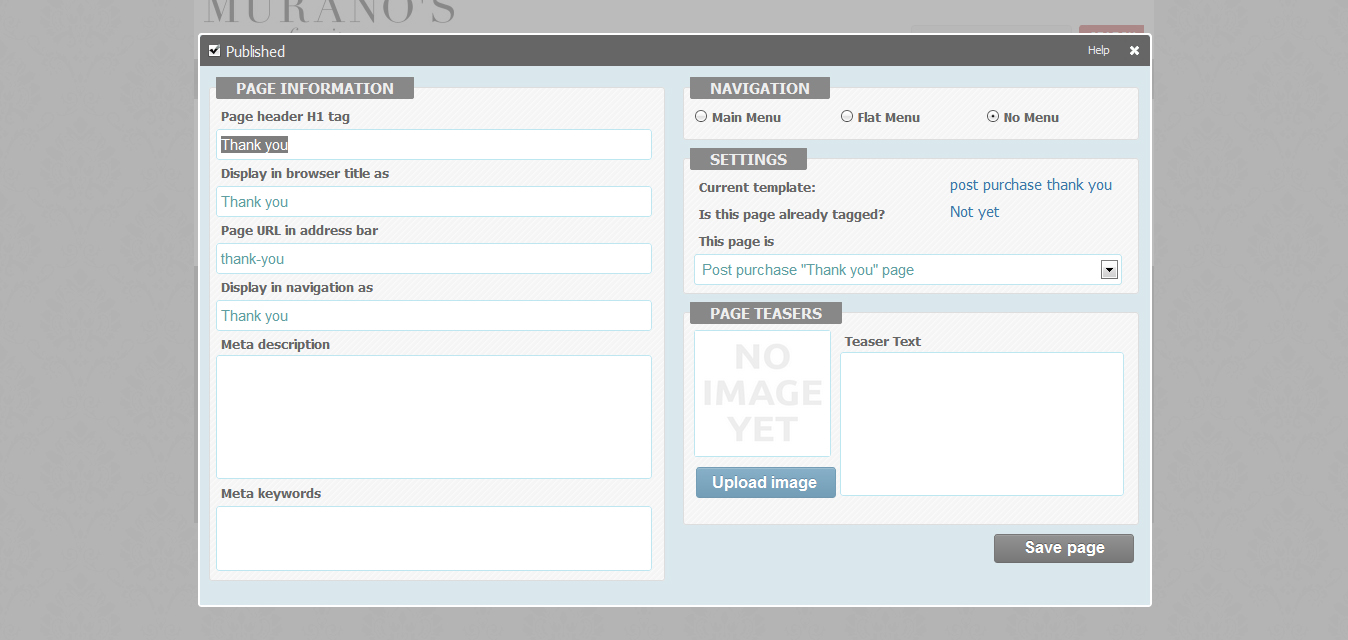
5. Create a post-purchase or "thank you" page template
Time required to perform this step: 5 to 20 minutes
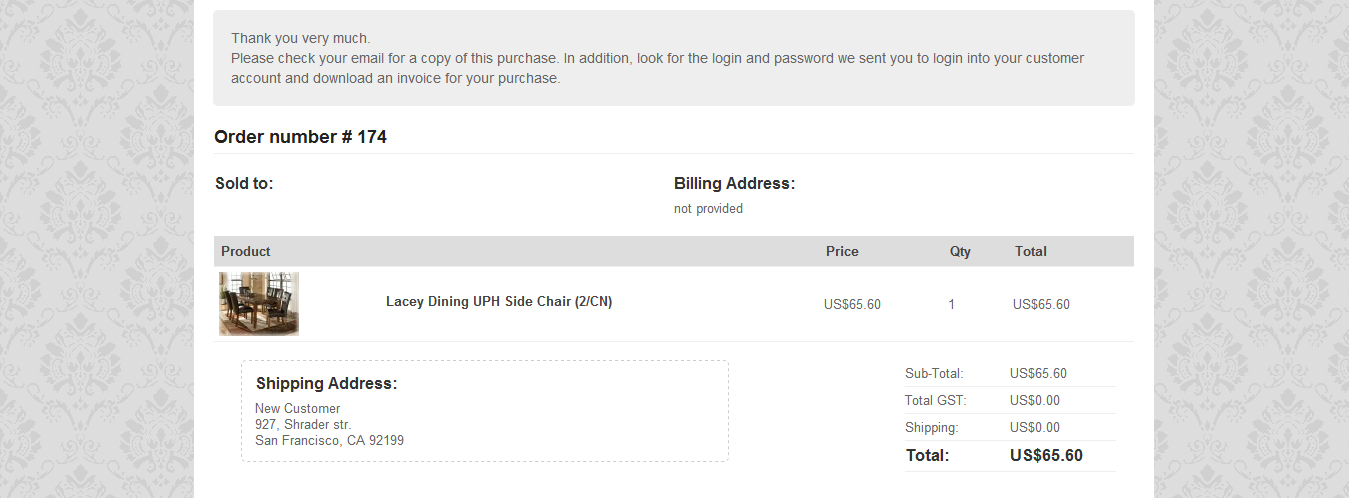
Customers get redirected to a "thank you" page following a purchase on your web store. This page confirms that the order has been received by your store, the content of the cart, as well as shipping or pick-up information as necessary.
Create a template, include a personal thank you message as well as {store:postpurchasereport} widget to bring a purchase summary. Of course, feel free to add a personalized video message, feedback form or anything else. Why not adding one or more editable content areas, or "content containers" within the template? This way it will be easy to instantly add new content or widgets to pages using this template right from the web page itself (that's the principle of online editing after all). Once again, no developer intervention needed.
6. Create the greatest post-purchase "thank you" page of all time
Time required to perform this step: 2 minutes
Now that you have created the post purchase template, create the page itself, select the appropriate template, and assign the [Post purchase "thank you" page"] role to the page from the add page/edit page properties control panel menu.
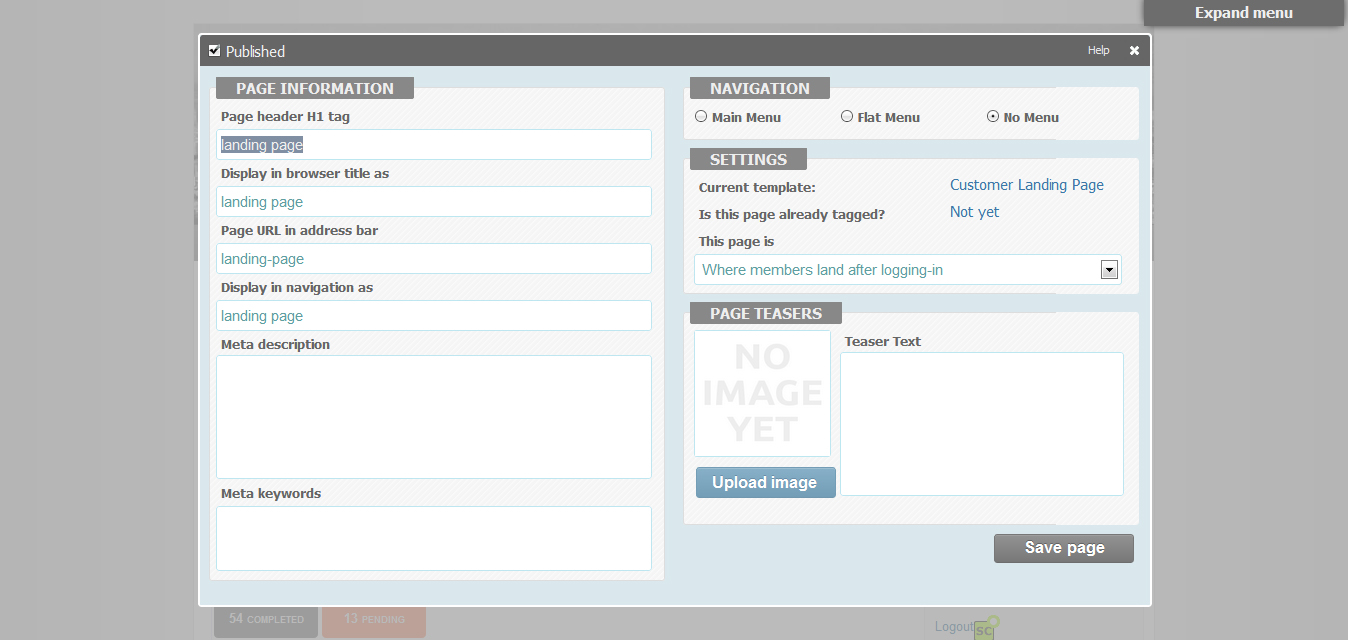
7. Create a customer account landing page template
Time required to perform this step: 5 minutes to 1 hour
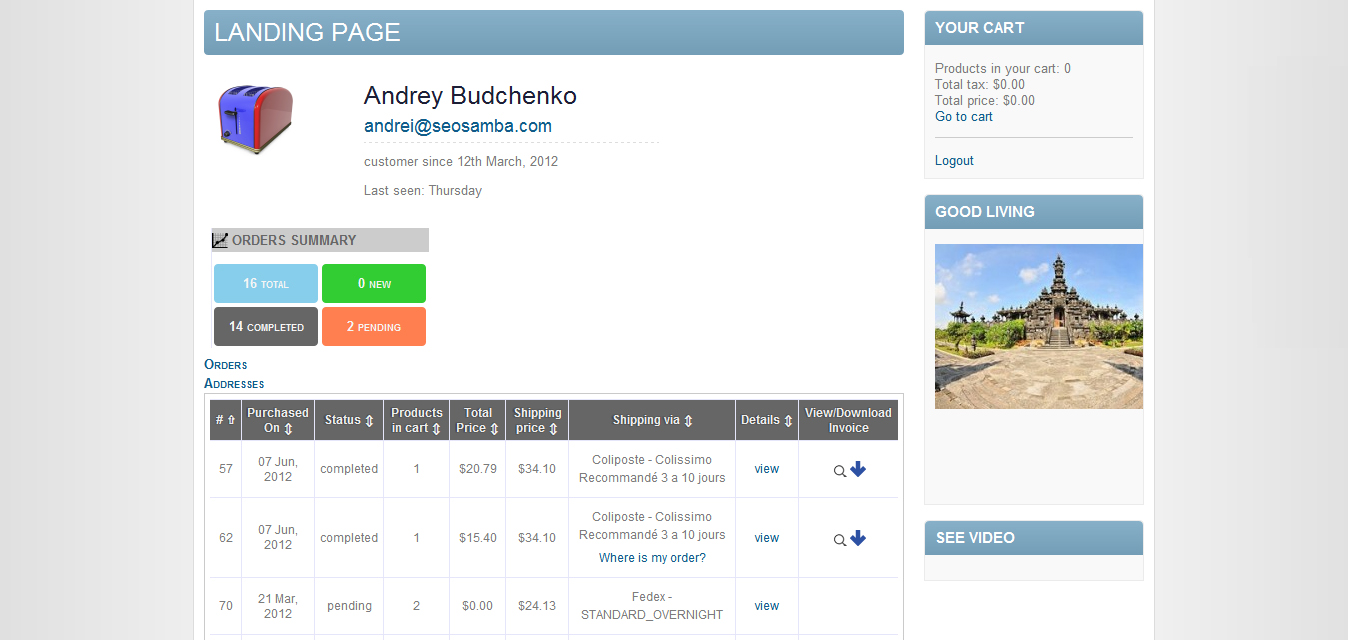
In this step we are creating a landing page for your clients when they log into their private customer account. Make sure to include the {store:profile} widget to bring account information such as profile, purchase history as well as postal addresses.
As usual feel free to add any widgets such as videos, forms etc,, or links to other pages (you can use the member only menu to keep these pages for your client eyes only), and add an editable front-end area for on-the-fly inline editing page customization.
8. Create your actual customer account landing page
Time required to perform this step: 2 minutes
Now that you have created a client account page template, go ahead and create the actual landing page itself. Select the template you have customized, and assign it to the appropriate role within the "SETTINGS" section of the create page/edit page properties screen.
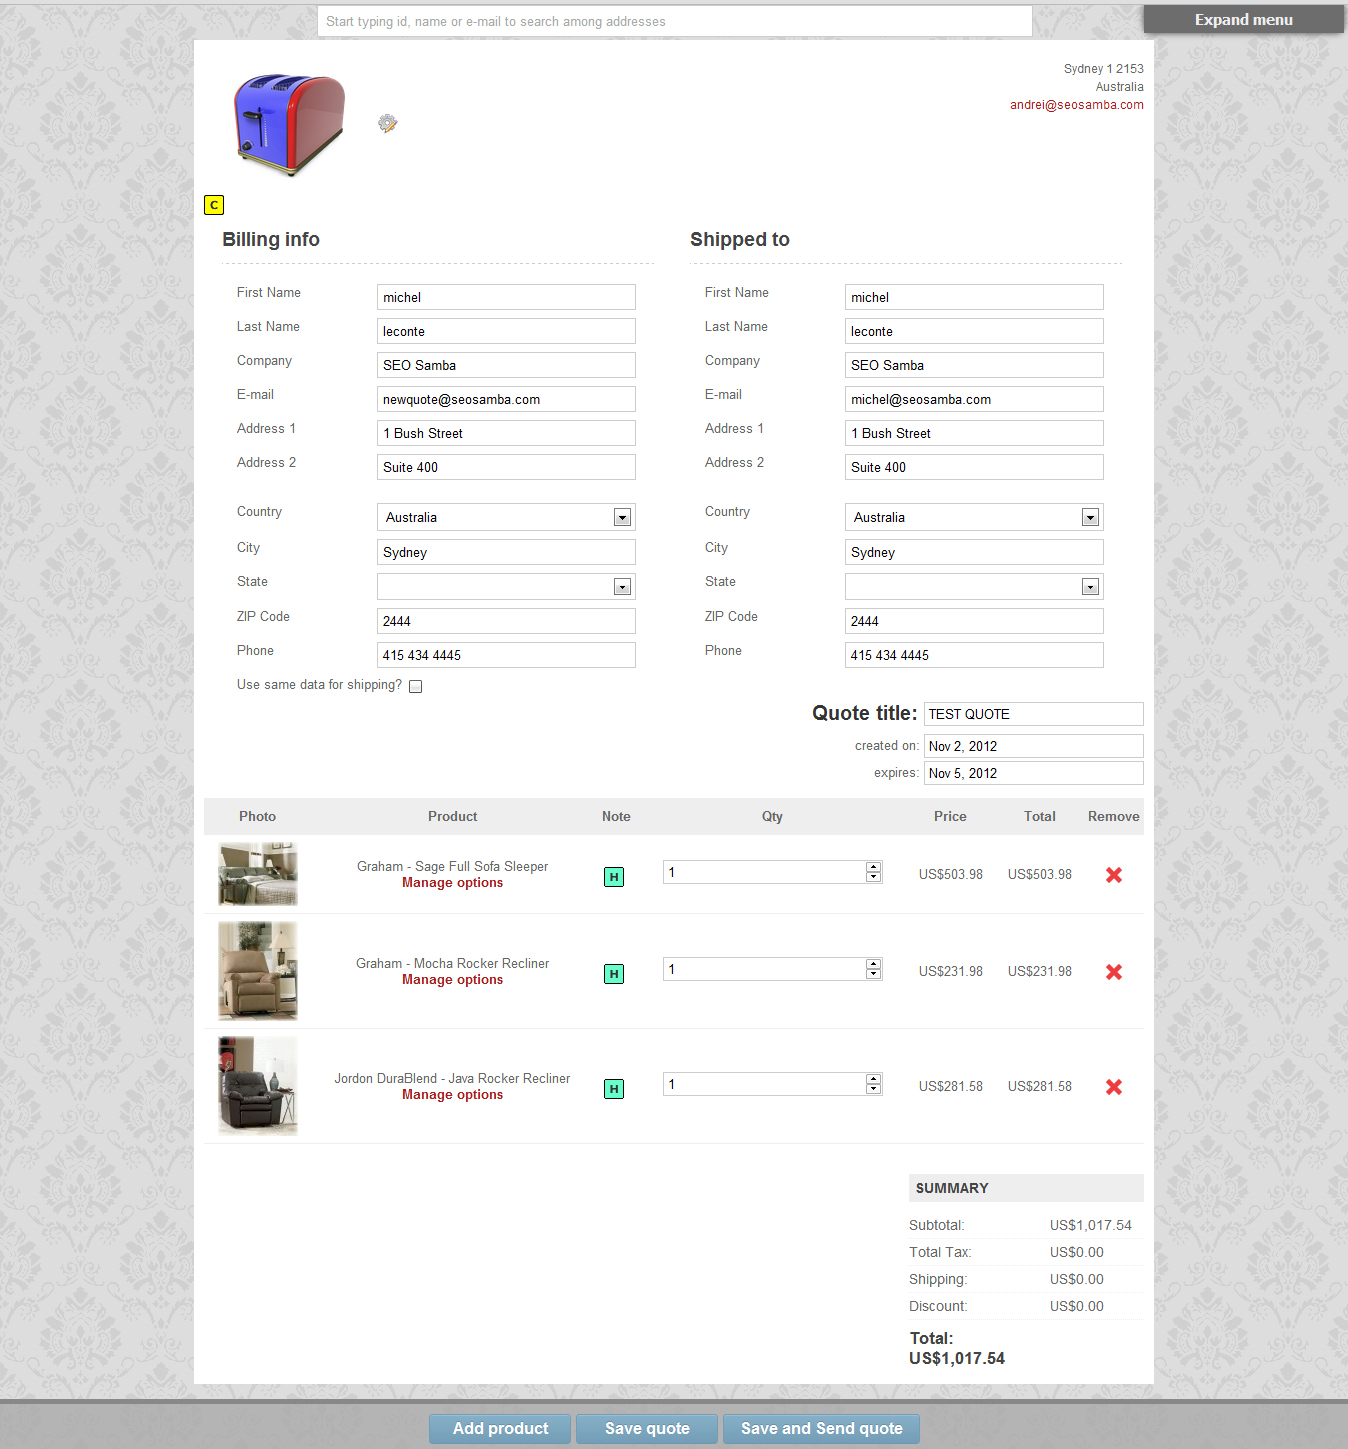
9. Create your sales quote template
Time required to perform this step: 5 minutes to 1 hour
SEOTOASTER includes a powerful quote system that is ideal to sell expensive or otherwise complex products that require a consultative approach. It is also very useful to further a sales call with an online quote to finalize a sales through online credit card processing.
Your quote template is used both for the back-end dashboard area, accessible from STORE/go to dashboard menu, and by your website to display a quote on a private url for your customers. From the dashboard area, you can create a quote from scratch or process a quote request coming from your web store (you can add the quote widget to the checkout page for multi-products quote request scenario or to your product landing pages for single product request scenario), while customers can view and finalize a purchase from their quote.
In addition to prospects information, and products selected from your catalogue by the admin or customer themselves, your quote template can include any number of widgets.
A quote template is included into the theme skeleton. Here is a quote template example:
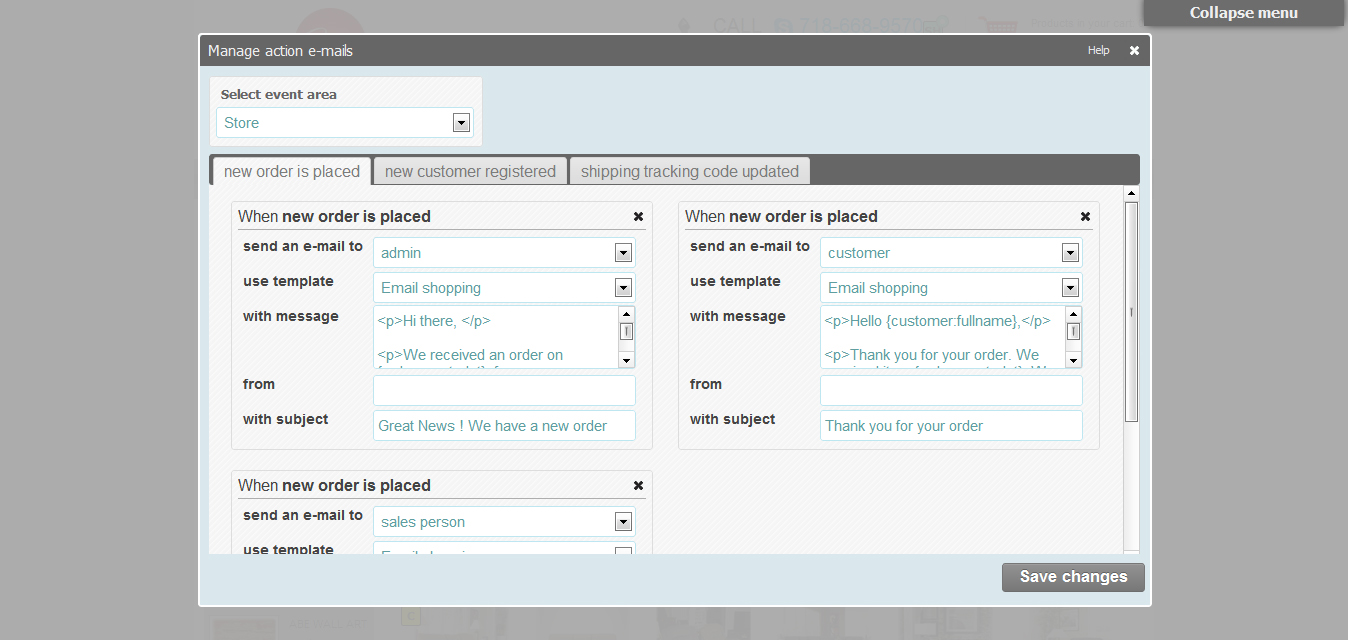
10. Customize automated emails
Time required to perform this step: 5 minutes to 1 hour
SEOTOASTER ships with a powerful, yet easy-to-use action emails facility. This communication tool send emails automatically when a set of conditions are met. This screen can be accessed from the OTHER/action-email menu on your control panel.
By default, SEOTOASTER V.3 ships with a pre-configured set of action emails and associated text. Feel free to add more trigger or modify the text. Action emails shortcuts can be inserted to personalize emails with information such as customer name, IP, shopping cart content, quote url's, and more. A complete list of available email shortcuts can be found here.
Pre-set Ecommerce emails include:
- When a customer orders for the first time, a registration email is pre-configured to make them aware of their private client area on your web store along with login and password.
- When a new order is placed: A notification email is sent to the admin, sales person and customer. These emails contain text and information appropriate for the recipient; the order itself, delivery & billing address of course, but also buyer's IP address, referral origin with key-phrase used to reach your website for your sales and administrators.
Here is the screenshot of the action e-mail facility:
Watch a short movie about SEOTOASTER's automated email system here.
What about my email's design you may ask?
Well, just create any number of HTML templates (keep in mind to use Website ID card tokens to keep your business information such as logo/address etc.. in sync), save them as email templates. Then select the template to be used for each trigger you're configuring in the action email facility.
Ecommerce theme skeleton ships a default email template built referring Website ID tokens. Make sure to have your Website ID card and store config panel properly populated.
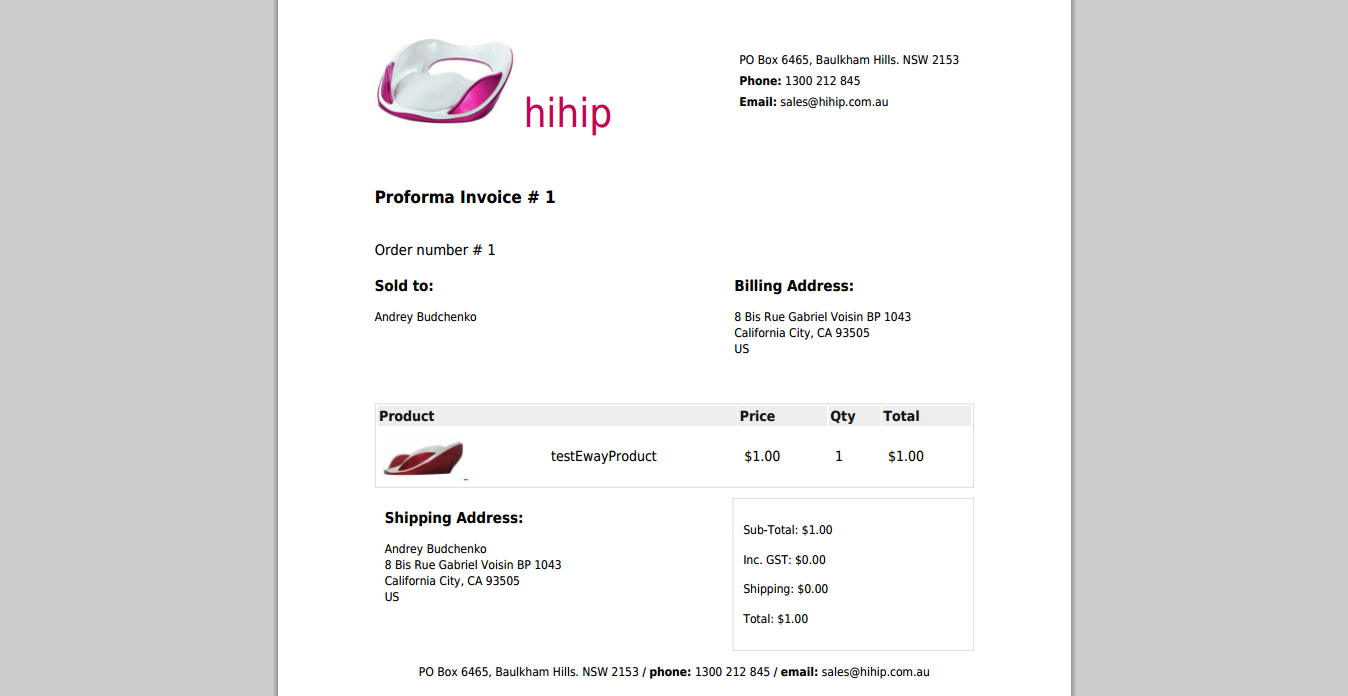
11. Customize & assign invoice template
Time required to perform this step: 2 minutes to 1 hour
SEOTOASTER handles your Ecommerce needs from end-to-end. PDF of invoices are created on the fly for a transaction marked as complete, and made accessible automatically at that point within the customer's private area. These invoices use an invoice template as defined in the STORE/config menu panel. Invoices reflect store configuration options such as tax configuration labels or display options (included/not included).
Edit your invoice template provided with the theme skeleton, and feel free to add Website ID card tokens or other text or image information. Here is the example of how an invoice looks when using the default theme skeleton's invoice template:
12. Upload your store back-end dashboard theme
Time required to perform this step: 5 minutes
SEOTOASTER E commerce edition provides a great customizable back-end for your web store. In effect, your store dashboard is a theme of its own, and is uploaded to the system under the STORE/config menu. The set of files included in the theme skeleton above includes a great looking default dashboard theme. You can view this store dashboard in action when accessing our Ecommerce demo site. Here is also a screenshot for the provided E commerce back-end theme:
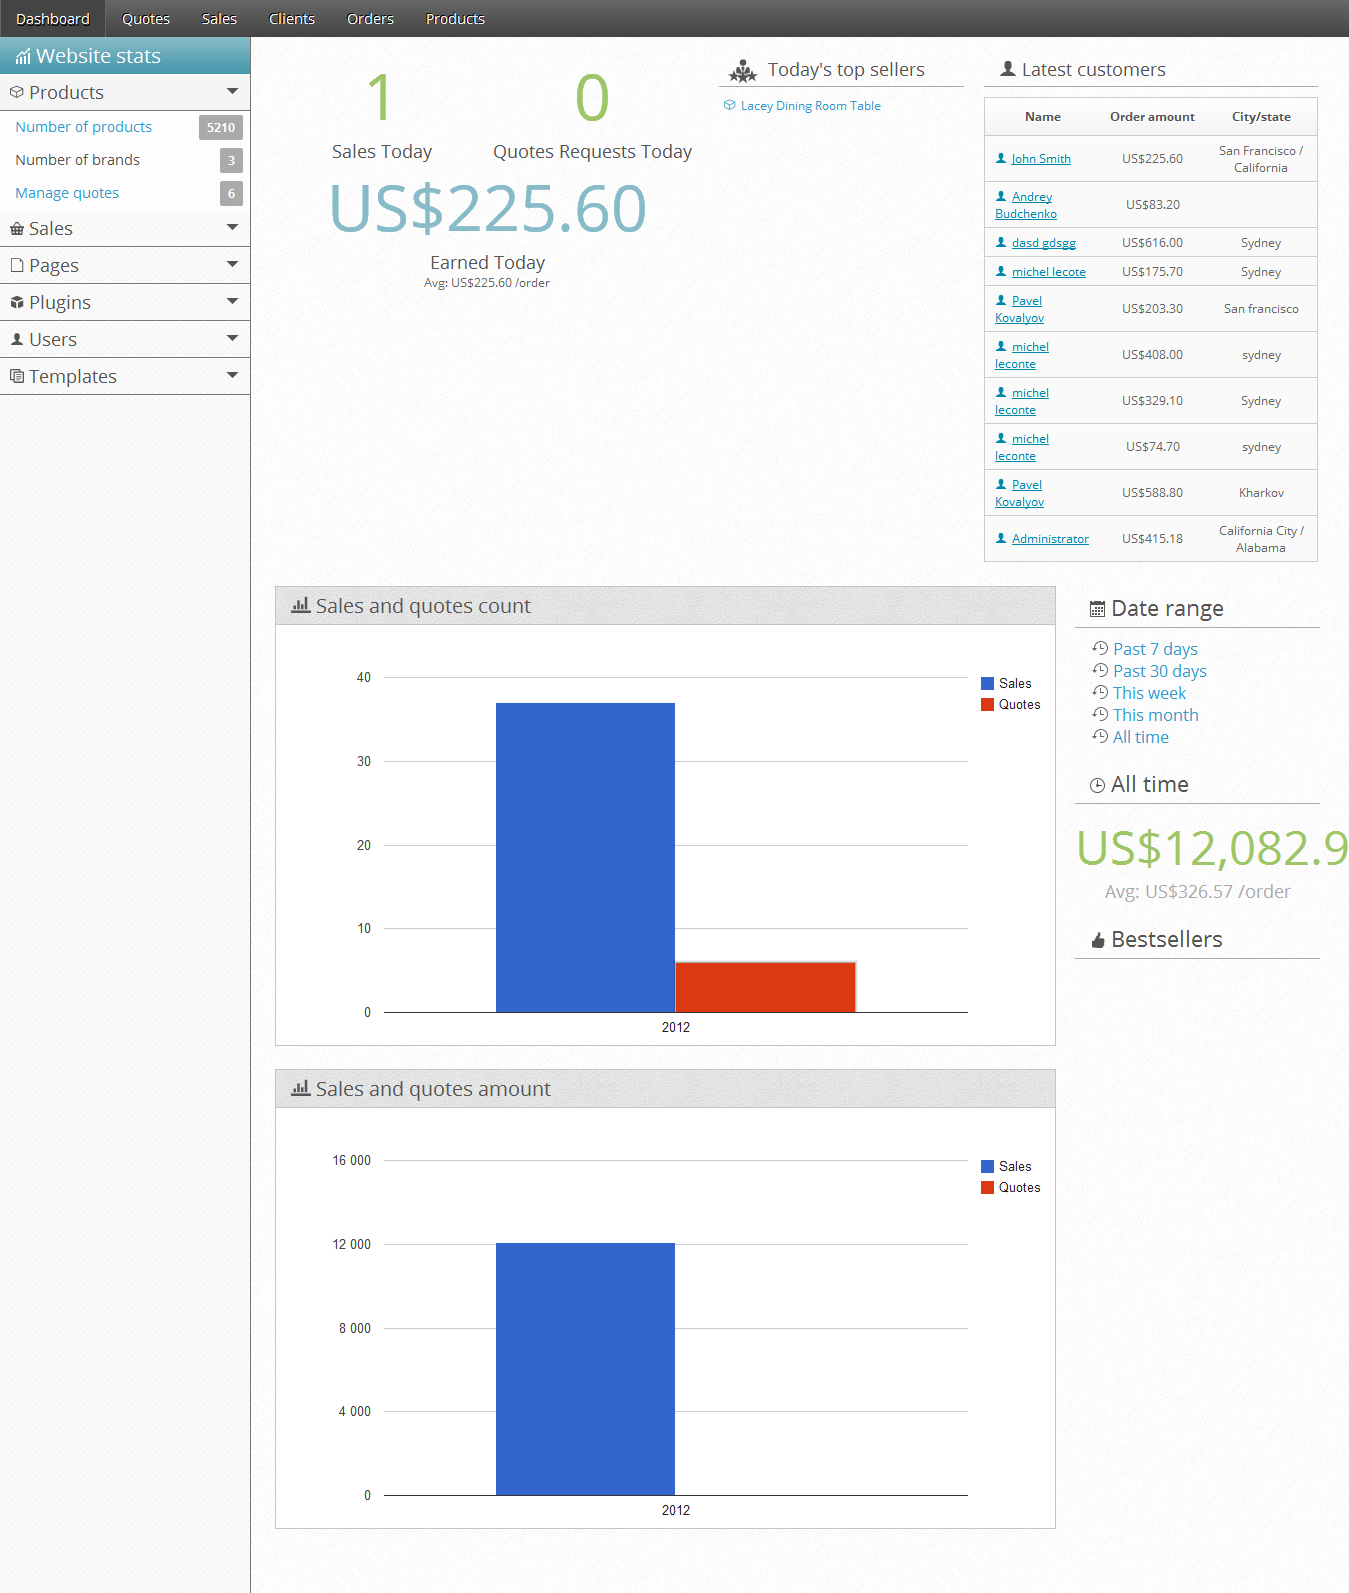
More information about SEOTOASTER Ecommerce store dashboard can be found here.
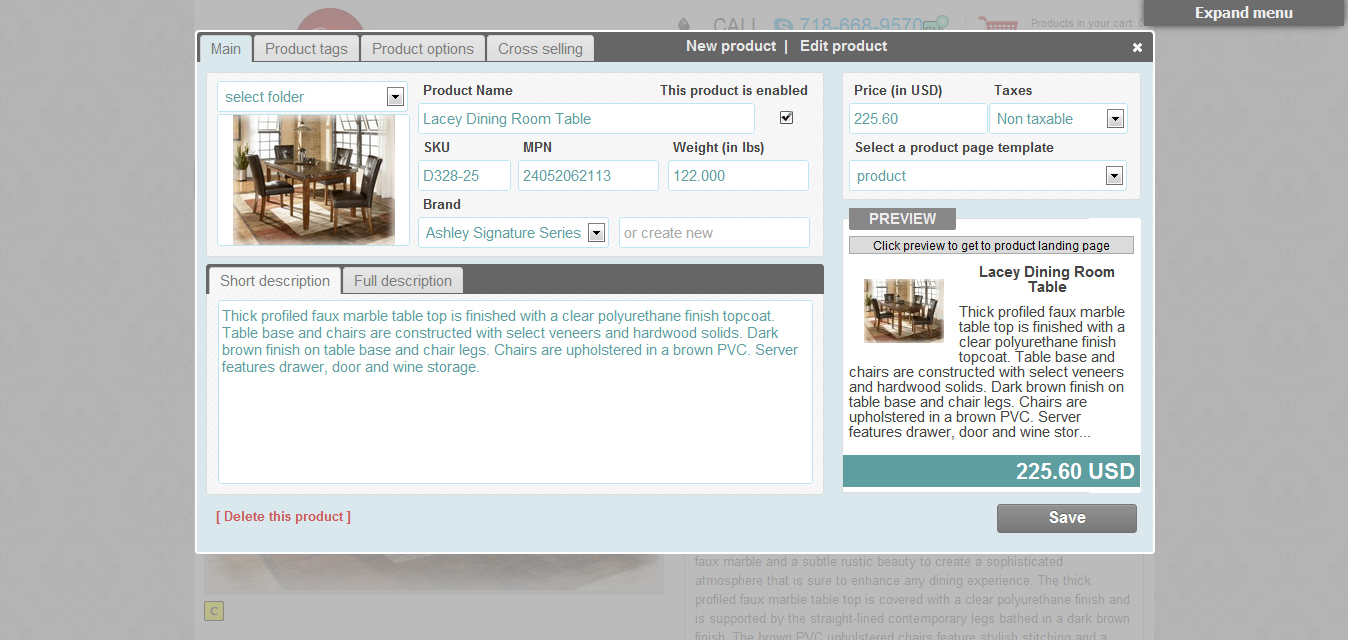
13. Capture product catalogue and double check data
Time required to perform this step: Based on your catalogue size & input method
SEOTOASTER provides a great environment for accessing and managing your product catalogue. Start with creating brands & uploading their associated logos, then add a product. Make sure to set a price, weight, brand, short and full description, then select a product template. Tag your products to organize your catalogue and help you create dynamic product lists. You can also easily create price and weight modifying options. For this, just go to the product options tab, select controls for product options, and save them in your library to re-use them with other products. These product options will automatically appear on your product landing pages where the proper shortcut has been placed. A lot more information on how to work with your products can be found here.
Here is a screenshot of a filled up product card:
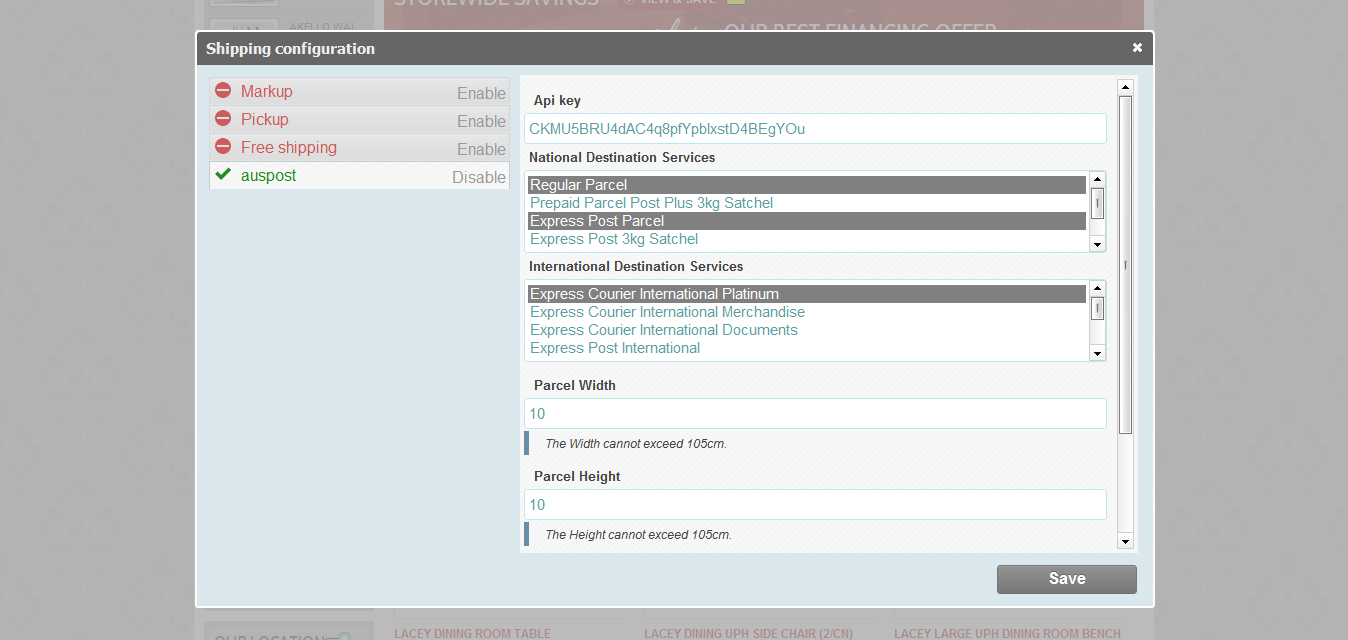
14. Install & configure shipping plug-ins
Time required to perform this step: 10 minutes
After having reflected on the shipping options you wish to offer your website visitors, and having installed any required real-time shipping quote plugin, then go to the STORE/shipping config menu.
Now, select the appropriate options and shipping products that will be made available at checkout.
When using real-time quotes, be mindful of the shipper's service limitations such as shipment weight or linear sizes which are commonly restricted by shipping providers. If none of your selected shipping method is found to be suitable for a given cart, a message will invite your visitors to contact you to arrange for delivery. Then test your checkout mechanism to verify behavior against your expectations.
More information about the shopping cart shipping calculator can be found here.
A screenshot of the shipping configuration screen:
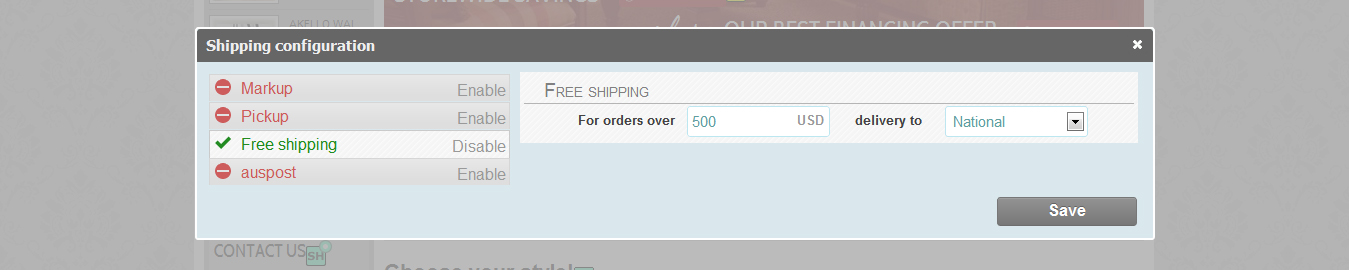
15. Configure free shipping threeshold as required
Time required to perform this step: 1 minute
Use free shipping configuration screen to set up the cart's amount over which orders will ship for free. Your buyers will then see an upbeat congratulations message when they qualify for free shipping.
16. Set your shipping markup amount
Time required to perform this step: 1 minute
Use the shipping markup screen to add a flat amount to each real-time shipping quote returned by your shipping providers.

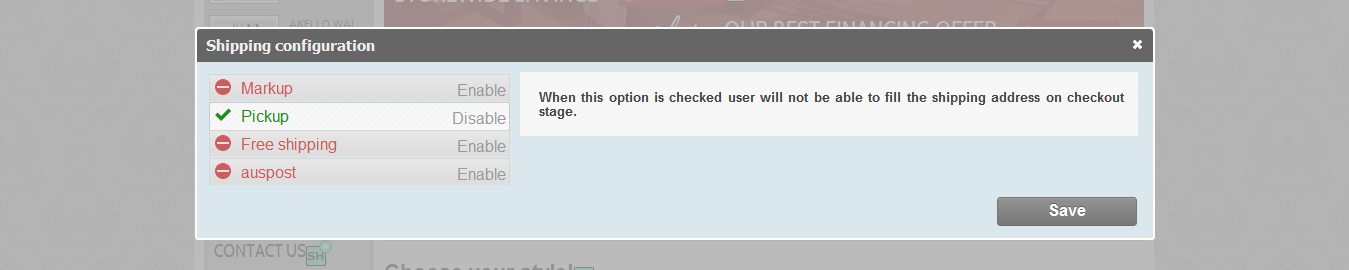
17. Enable pickup option if necessary
Time required to perform this step: 1 minute
Switch on the pickup option as required. When your store config is properly populated and that you're using the provided checkout template, your store address along with a map to locate your business automatically appears when a customer chooses pickup at checkout.
18. Install & configure payment plugin
Time required to perform this step: 10 minutes
After uploading your payment gateway, inserting the appropriate shortcut on the checkout page, and paying any plugin licensing fee if required (a link will appear on your checkout page), insert credentials in your plugin config screen.
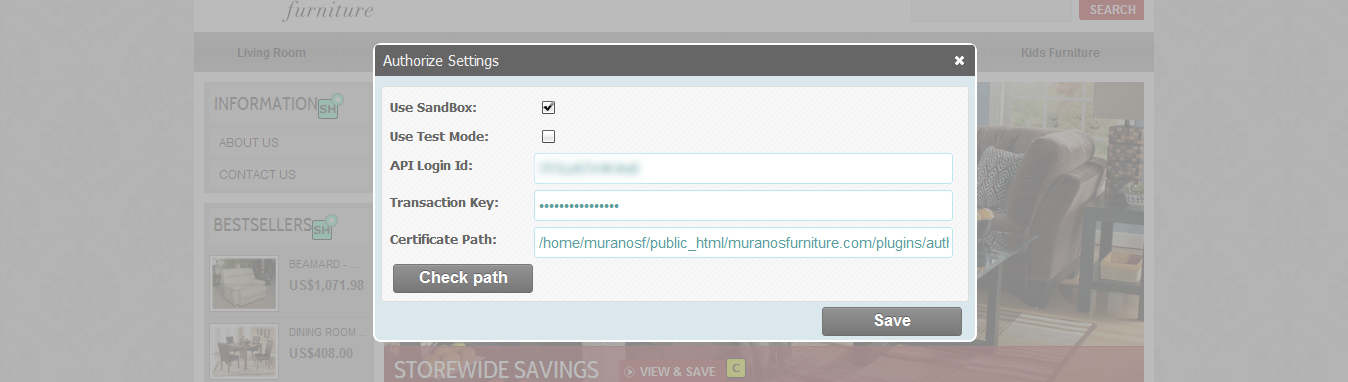
Example of the Authorize plugin set.
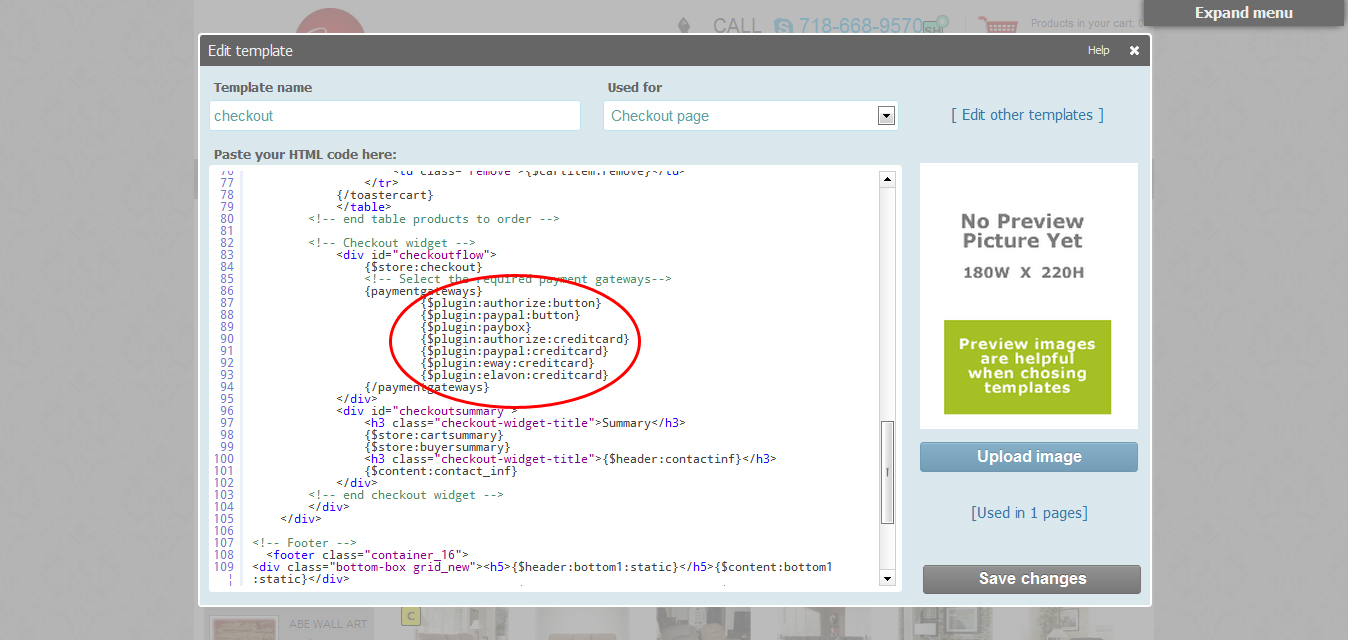
Example ot the payment plugin shortcodes in html template. Make sure you use the right one.
Here is another freebie just because you've read it all
Once your web store is ready to go, visit our free privacy policy builder to generate an instant custom terms & conditions policy for your web site.