CRM Frequently Asked Questions
How to import data from your previous solution or spreadsheets to your SeoToaster CRM?
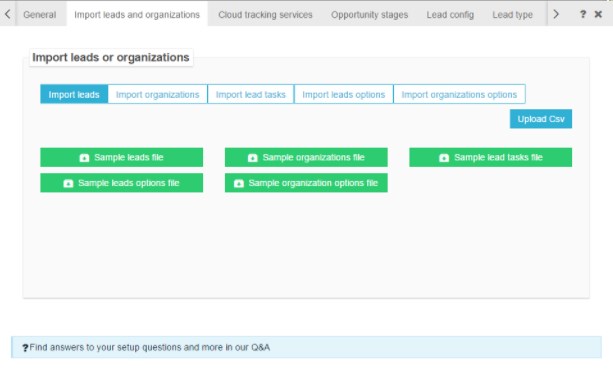
Go to “Import leads and organizations” tab of CRM config screen, download sample file for leads, lead options, organizations, organization options or tasks, fill it in with your data and upload CSV.
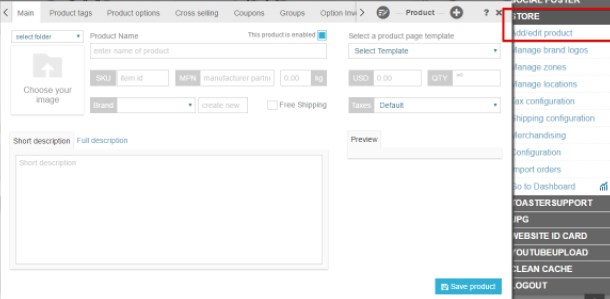
How to add products and services?
Go to STORE / Add/edit product screen. Here you can also set products tags and options, configure related products, manage inventory and many more
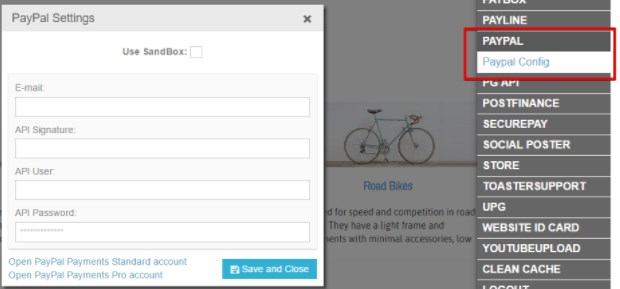
How to add PayPal credentials?
Go to PAYPAL/ Paypal Config on your Admin panel. If you have a standard PayPal account you can add a widget for PayPal button to checkout template and to the quote template and you only need to fill in the email field.
In case you have a Pro account (only available for USA, Canada and Australia) you can insert the direct payment form on checkout using this widget . For this you would need to feel in all fields.
How to manage Opportunity stages?
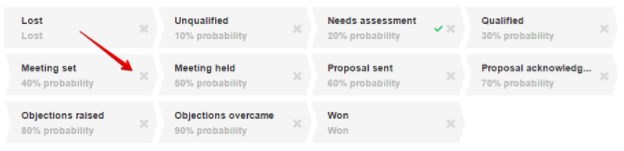
We’ve preset different opportunity stages for you. You can find them on Opportunity stages tab of CRM config screen.
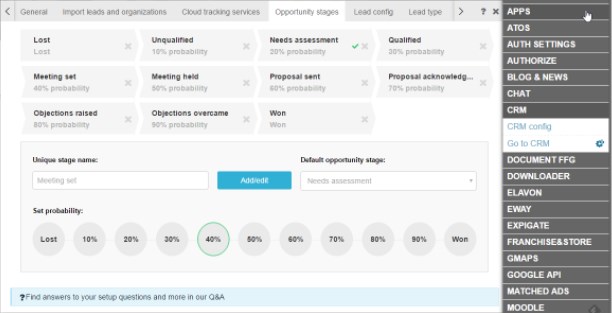
To delete one simply click on the cross
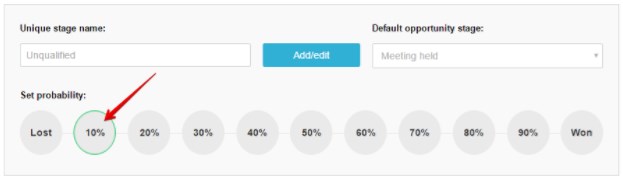
To edit one, click on the probability icon you would like to edit and set the stage name that suits you best.
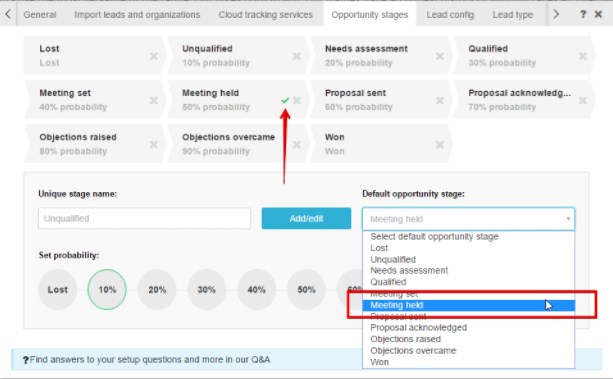
To set a default opportunity stage just choose one from the dropdown. The default stage will be ticked.
What is “Lead config” tab for?
Here in Lead config tab you can, firstly, set task alerts in order for your sales people and admins to be reminded of upcoming tasks. Don’t forget to set action emails for task reminder in OTHER / Action emails & SMS / Lead / Task reminder section.
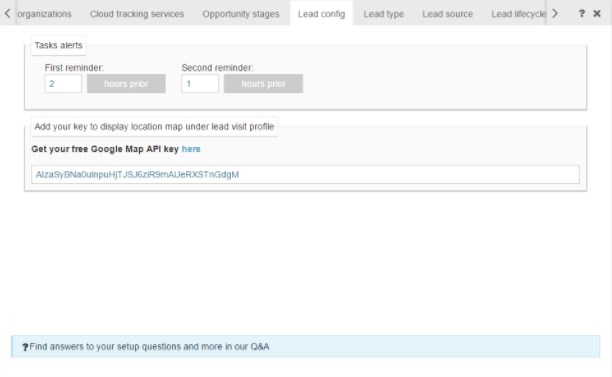
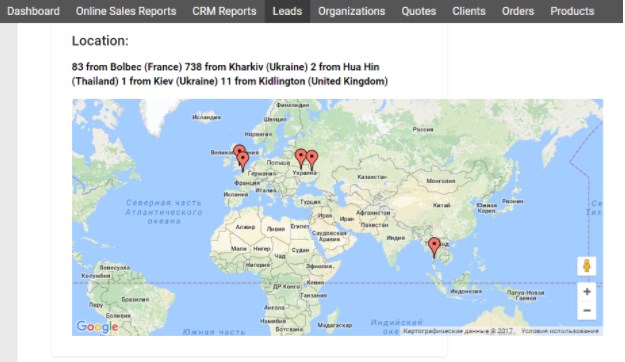
And secondly, here you can add Google API key used on your website in order to be able to see on the map on lead profiles where your site visitors came from.
Lead type
In Lead type tab you can see four preset lead types which you cannot either edit or delete. These lead types get assigned automatically to the leads who got to the system by submitting a form, or making a purchase, or registering on your site, or downloading something.
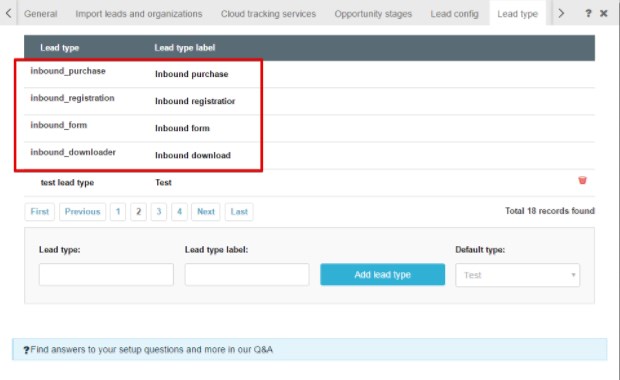
You can also configure your own lead types for those leads who get added to the CRM manually. You can even choose a default lead type that will be added to any new manually created lead by default. Lead types for any particular lead can be set from your CRM Lead screen.
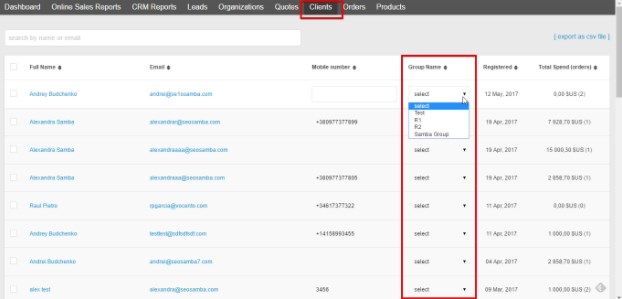
How to create customers groups?
You can find these settings on Customers groups tab in STORE / Merchandising section. Set a group name and price modifier either in % or USD.
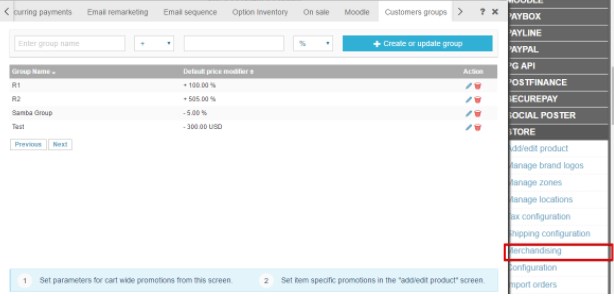
You can manage your clients and ser appropriate customers groups on the Clients tab on Dashboard (STORE / Go to Dashboard).
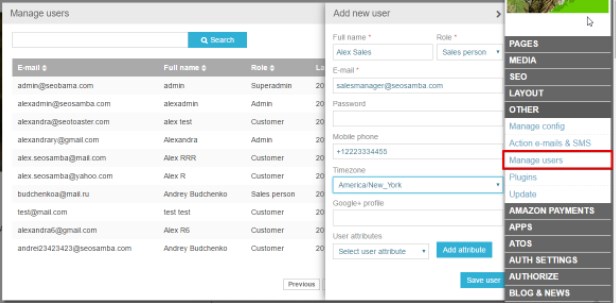
How to create sales users?
Go to OTHER / Manage users and add new user or modify existing ones. Choose Sales person role for your sales staff and don’t forget to add a mobile phone number so that they could dial leads out.
How to set up a toll-free or local sales phone numbers anywhere in the U.S. and around the world to track inbound calls?
Once you’ve opened your SeoSamba free account and logged in, go to Lead Tracking tab where you will see "Buy a phone number anywhere in the world" button. Click on it and you’ll find the following configuration screen where you can search for a phone number with desired options:
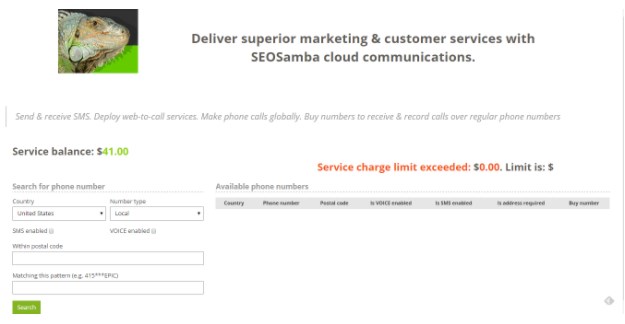
You can choose a country, number type (local, toll-free or mobile), search for a number within a specific zip code or matching some particular pattern:
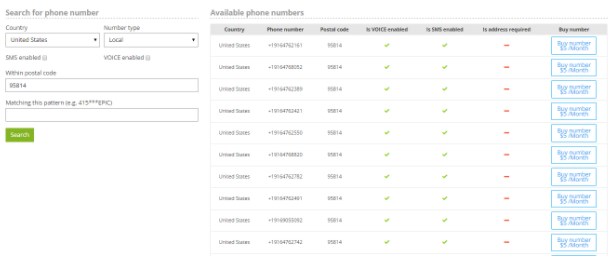
Buy any available phone number you choose by clicking "Buy number $ / Month".
What are the different lifecycle stages?
Subscriber: Think of subscribers as those folks who know about you and have opted in to hear from you periodically. In many cases your subscriber base is the segment of your contacts database that has only signed up for your blog or newsletter and nothing else. You should nurture a long-term relationship with subscribers and offer them content that will increase the chances that they will move forward in the customer lifecycle.
Lead: Leads have shown more interest in what you offer than subscribers have. Typically a lead has filled out a form with more than just an email address, often for some sort of content-based offer on your website. We see companies use the lead lifecycle stage for what we think of as general, broadly appealing, or top of the funnel offers. As each lead demonstrates a higher degree of sales readiness and qualification, they will move to further stages.
Marketing Qualified Lead: Marketing Qualified Leads, commonly known as MQLs, are those people who have raised their hands (metaphorically speaking) and identified themselves as more deeply engaged, sales-ready contacts than your usual leads, but who have not yet become fully fledged opportunities. Ideally, you should only allow certain, designated forms to trigger the promotion of a lead to the MQL stage, specifically those that gate bottom of the funnel offers like demo requests, buying guides, and other sales-ready calls to action.
Sales Qualified Lead: Sales Qualified Leads are those that your sales team has accepted as worthy of a direct sales follow up. Using this stage will help your sales and marketing teams stay firmly on the same page in terms of the quality and volume of leads that you are handing over to your sales team.
Opportunity: Opportunities are contacts who have become real sales opportunities in your CRM.
Customer: This is everybody’s favorite lifecycle stage: an actual, paying customer.
Evangelist: Evangelists are those contacts that are advocates for your business - they sing your praises from the rooftops! They are usually a small but vocal group who will refer new business to you unsolicited. Leveraging their networks often bring in new customers and help you reach leads you may not have been able to otherwise.
Other: Other is the wildcard lifecycle stage. Examples of what this stage has been used for include: closed lost opportunities, customer renewals, and key accounts.How to unsubscribe from sequences?
Just add the token {unsubscribe:link} at the bottom of the email template used by the relevant sequences.
You can have any number of HTML email templates in the system.
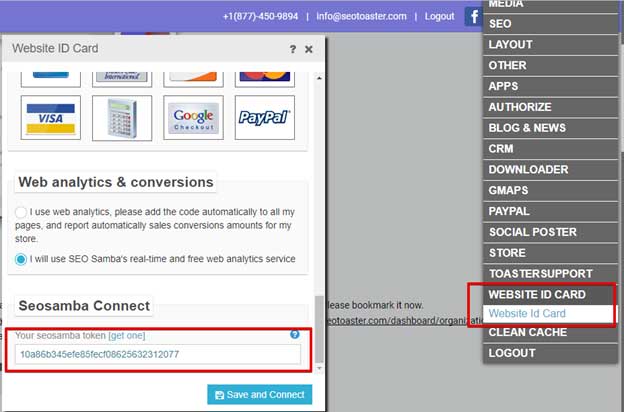
How do I connect my CRM to SambaSaaS
To register in SambaSaas follow the link provided within WEBSITE ID CARD or go directly to https://mojo.seosamba.com/register.html. Valid email address if a must in both cases.
Once logged into your SambaSaas account, go to your account settings to retrieve the SeoSamba token.

Then insert it into the relevant field at the bottom of your WEBSITE ID CARD found in your SeoToaster admin panel. Click Save and Connect and that’s it!
How do I track my leads sources?
Your CRM automatically displays your Ad campaign names. You need to
tag your advert destination URLs with Source utm tags in order for this to work.
There're 5
parameters you can add to your URLs:
utm_source- the advertiser that is sending leads to your website;utm_medium- the advertising or marketing medium;utm_campaign- the campaign name, slogan, etc.utm_term- the paid search keyword (optional);utm_content- differentiate similar content withing the same ad (optional).
Example of an URL:
http://www.example.com/?utm_source=newsletter1&utm_medium=email&utm_campaign=summer-sale&utm_term={keyword}&utm_content=toplink
Click here (https://support.google.com/analytics/answer/1033863?hl=en) to look for more information about how to create an ad campaign.
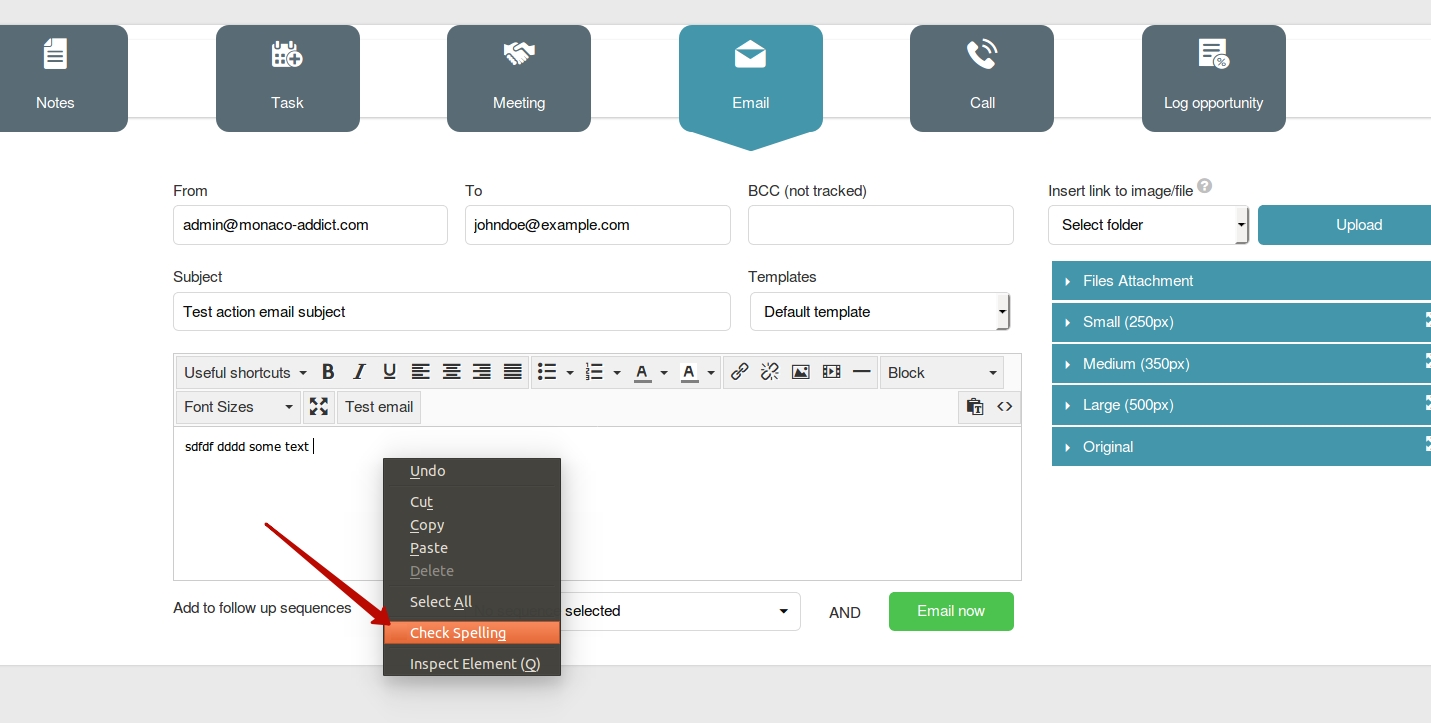
How do I enable spell-check in SeoToaster?
The easiest way is to use your default browser spell checker to check spelling of text fields. Don't forget to reload your page after enabling this feature.
Google chrome:
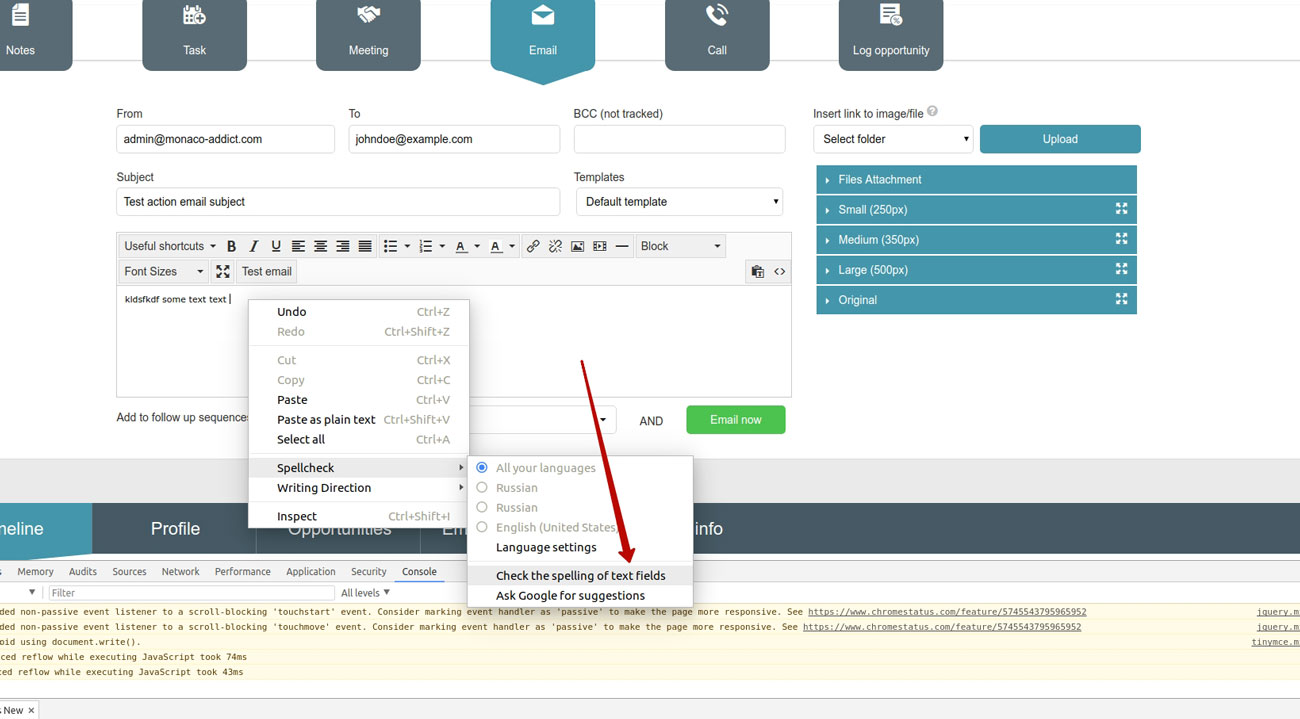
Mozilla firefox:

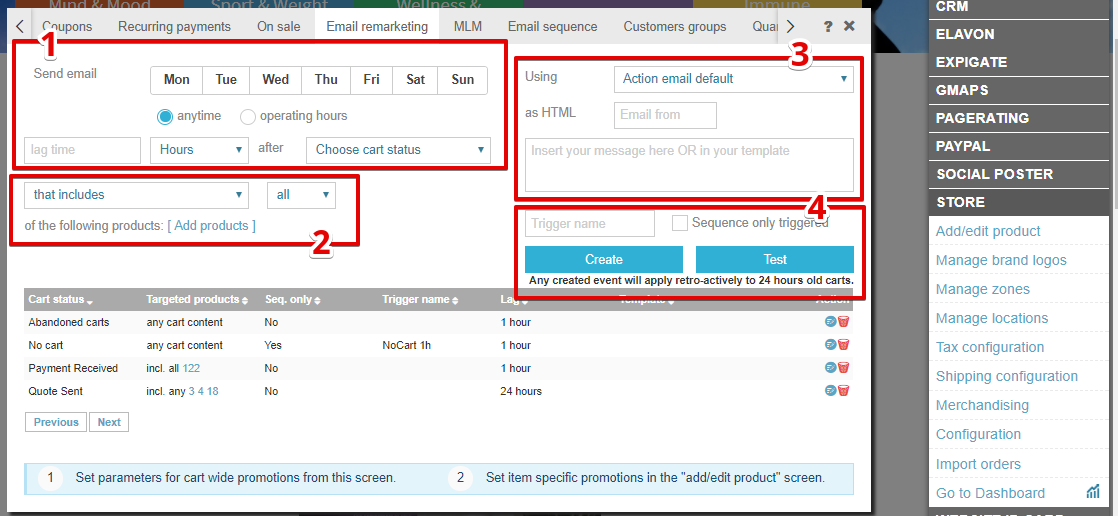
How do I configure email sequences?
Email triggers
First of all go to STORE / Merchandising / Email remarketing tab. Here you can create triggers for your email sequences.
-
Set time for your remarketing campaign. You can choose specific days of the week or operating hours of your store if any (configured in STORE / Configuration / Basic tab). Set a lag time after your client’s action.
Emails are sent once a customer has met the condition of a trigger. Triggers are defined as certain actions, which customers need to fulfill in order to receive an email. These actions may be purchasing, signing up, browsing or abandoning shopping carts and so on. No cart status is used in order not to wait for your leads to act and start your campaign right away.
-
If your campaign is pointed at some specific products, here you can select the cart content which would trigger the email sequence.
-
Select an email template and add a message here if it’s not already in the template.
-
Assign a name to your email trigger and tick the checkbox if you only want to use this trigger in sequence.
You can test the email right here by clicking ![]() and checking your inbox. After
reviewing the email,
you can modify the settings if necessary and create a trigger by clicking
and checking your inbox. After
reviewing the email,
you can modify the settings if necessary and create a trigger by clicking ![]() .
.
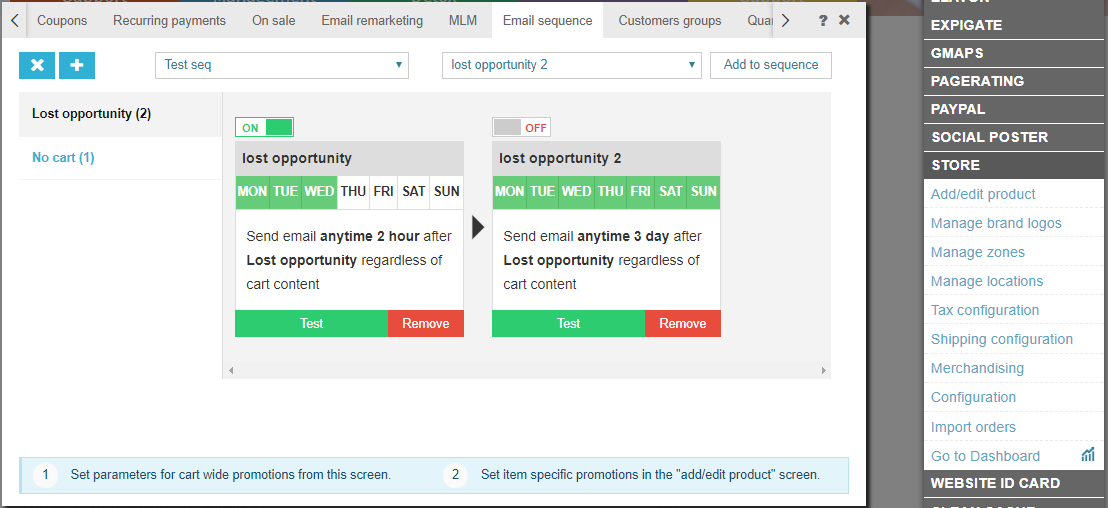
Email sequence
When needed triggers are created, you can add them to a sequence on STORE / Merchandising / Email sequence tab.
Click ![]() in order to create a new
sequence and assign a name to it. Then you can add triggers to the
sequence.
in order to create a new
sequence and assign a name to it. Then you can add triggers to the
sequence.
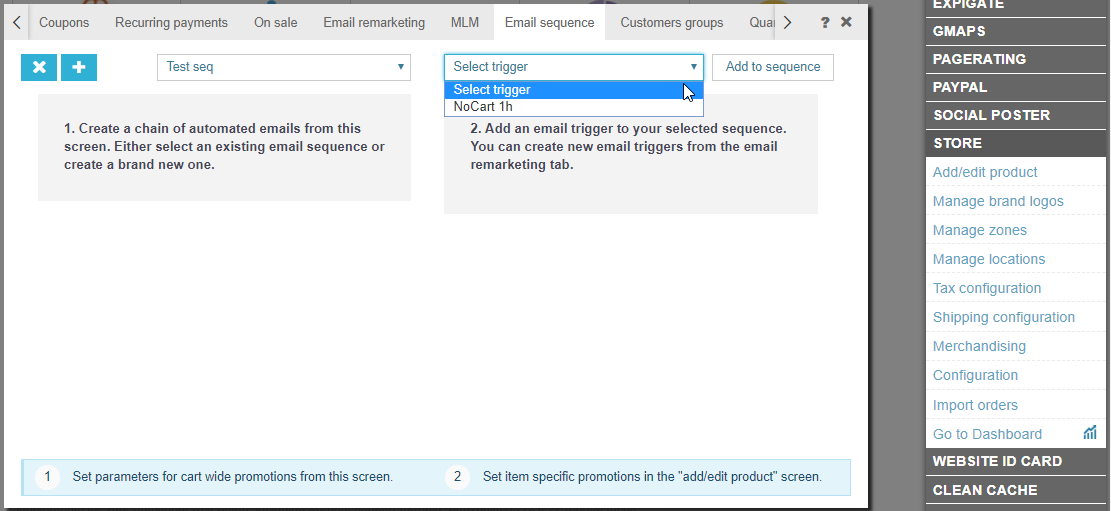
When triggers are added to the sequence, you will see them accumulated by cart status. The email are
OFF by default, switch them on after reviewing. From this screen you can edit your sequences, add
new triggers to them and turn the triggers on and off depending on your needs.
You can also test the emails from this screen by simply clicking ![]() .
.
Assigning email sequences
After an email sequence has been created you can assign it to your leads on the lead detailed screen.
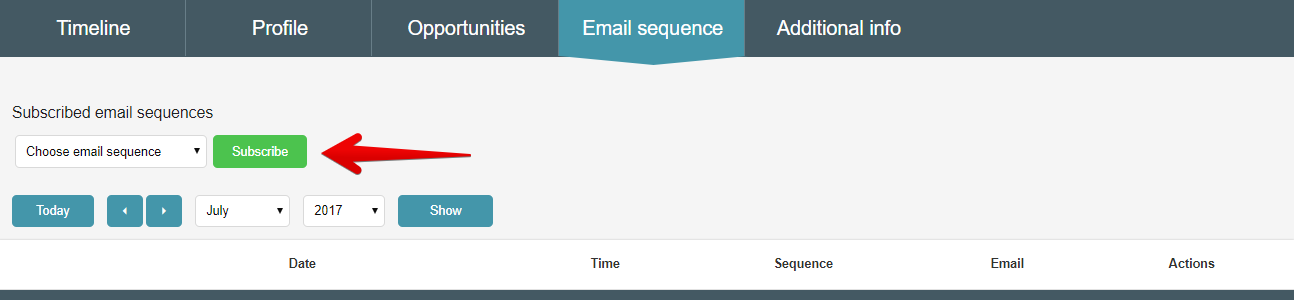
After cleaning the cache and page reload you will see your “no cart” status in upcoming emails in the
grid. Also you can test what a scheduled email will look like to your prospects by clicking ![]() - In
that case an email will be sent to your registered user account email.
- In
that case an email will be sent to your registered user account email.

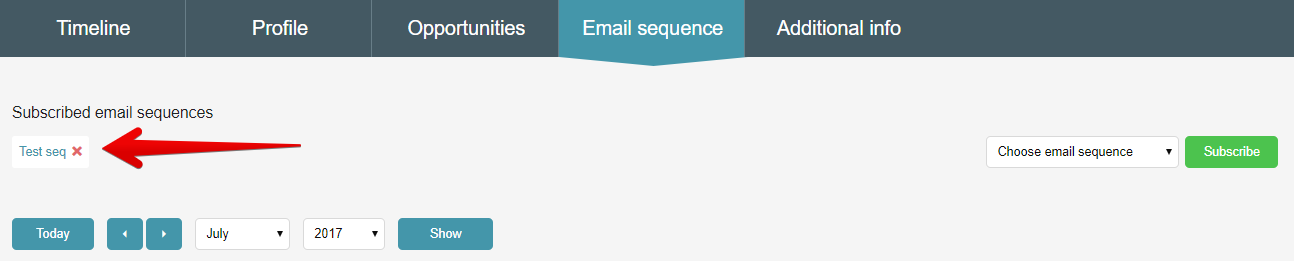
You can also add a follow up sequence when sending an email to a lead from lead detailed screen.
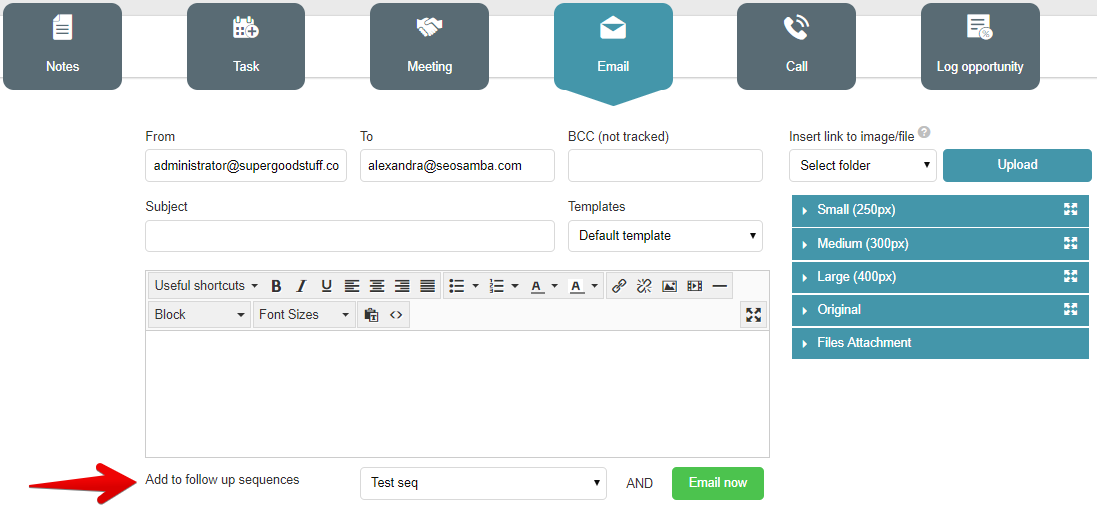
To delete a lead from a sequence simply click on the cross on the Email sequence tab of lead detailed screen
Email templates
You already have some pre-built email templates which you can use for your remarketing campaigns. The list of available templates will appear everywhere where there’s a possibility to assign one.
In case if you want to create a new template, go to LAYOUT / Add template and insert your own customized HTML code just like you would build any web page on SeoToaster.
Don’t forget to insert useful tokens into your emails:
{user:fullname}- brings up a user fullname;{cart:basket}- displays all products that had been added to the cart before user left it.{cart:recovery}- creates a link to the checkout page which contains all the items that had been added to the cart before the user left it.{unsubscribe:link}- creates a link for unsubscribing from the automated notification.
More shortcodes and tokens can be found here.
How to use web forms?
CRM form builder
CRM provides a wonderful opportunity to create lead forms both on SeoToaster- and Other CMS-sites. They are called internal (SeoToaster) and external (other CMS) lead forms. You can find this constructor by going to Workflows/Form builder.
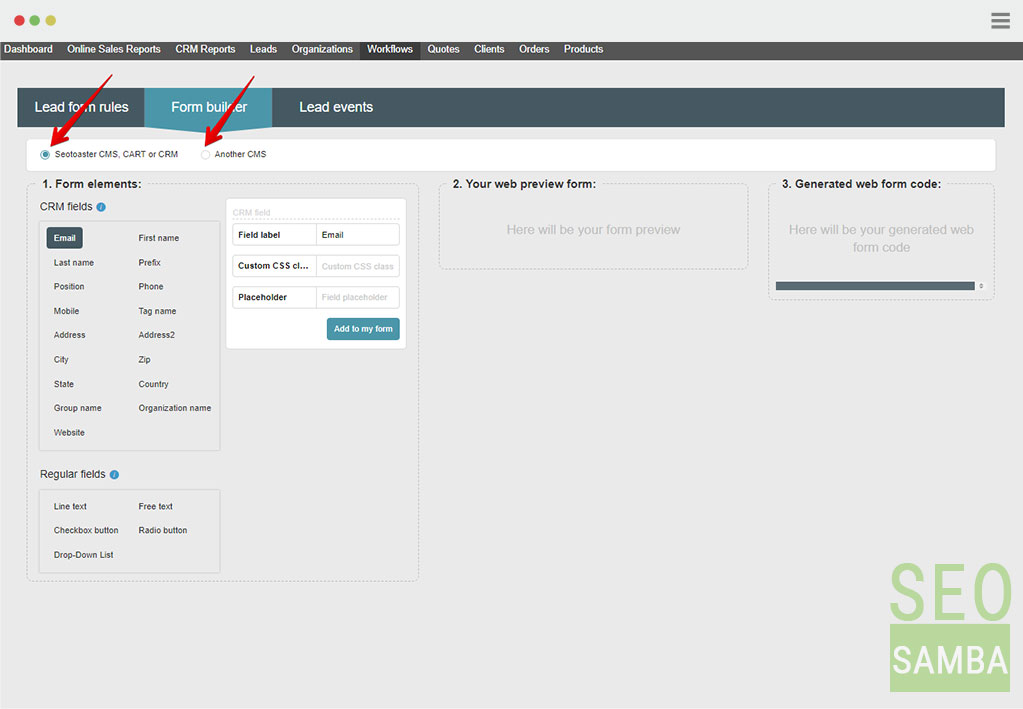
There are two kinds of Form Elements: CRM Fields - these fields are pre-coded to save your form data directly to the proper CRM field, and Regular Fields - these fields let you create custom form fields. Any data from these fields will appear under your lead notes.
Internal Lead Forms
To build a form on a SeoToaster site, firstly, you will need to compose a form adding the fields you would like to have in your form in the section 1. Form Elements. In case you want to change the number of fields or their settings or order, you easily do that with the help of form builder instruments in the section 2. Your web preview form.
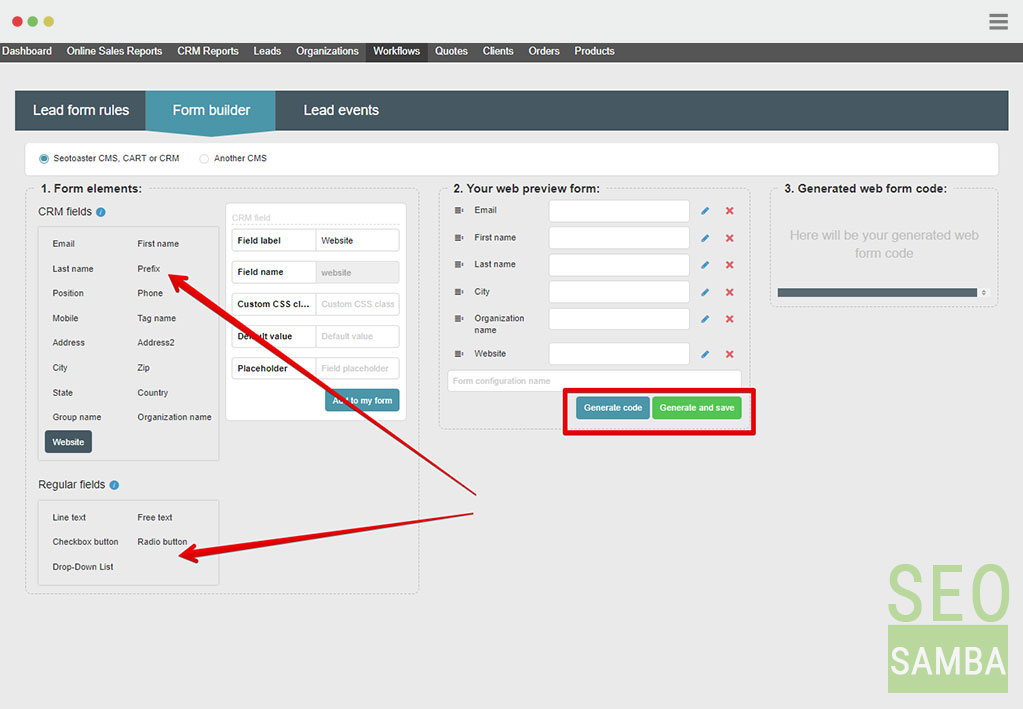
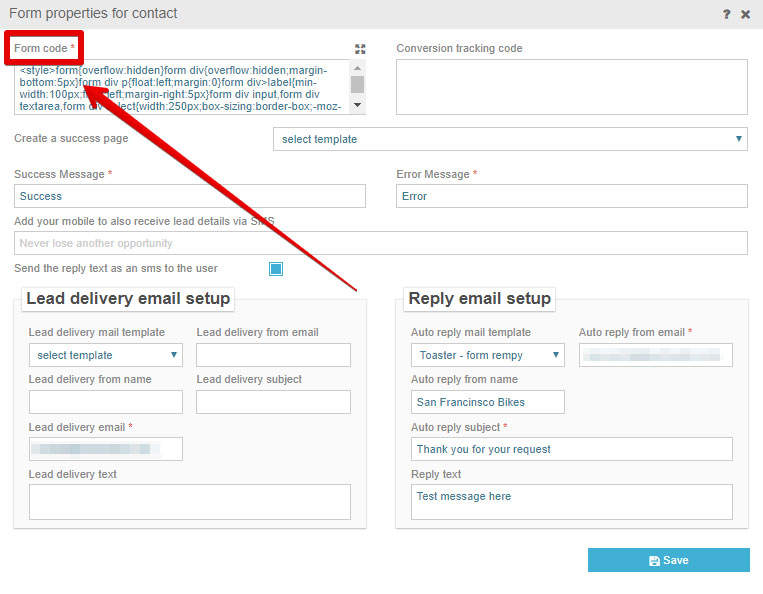
When all the fields are set up, you can click Generate code or Generate and save and an HTML code will appear in section 3. Generated web form code. Now you can copy it at one click using Copy code button

and paste into Form code field of the form properties on your SeoToaster website.
External Lead Forms
For an external lead form the sequence of actions is pretty the same, but with few alterations. For instance, you will need to get a recaptcha for your website to protect it from spam. It will be necessary to create key pairs and specify the domain name while doing it. You may find guidelines for creating a recaptcha here :
https://www.google.com/recaptcha/admin#list
You will need to generate reCaptcha 2
And then with all necessary data fill in all fields.
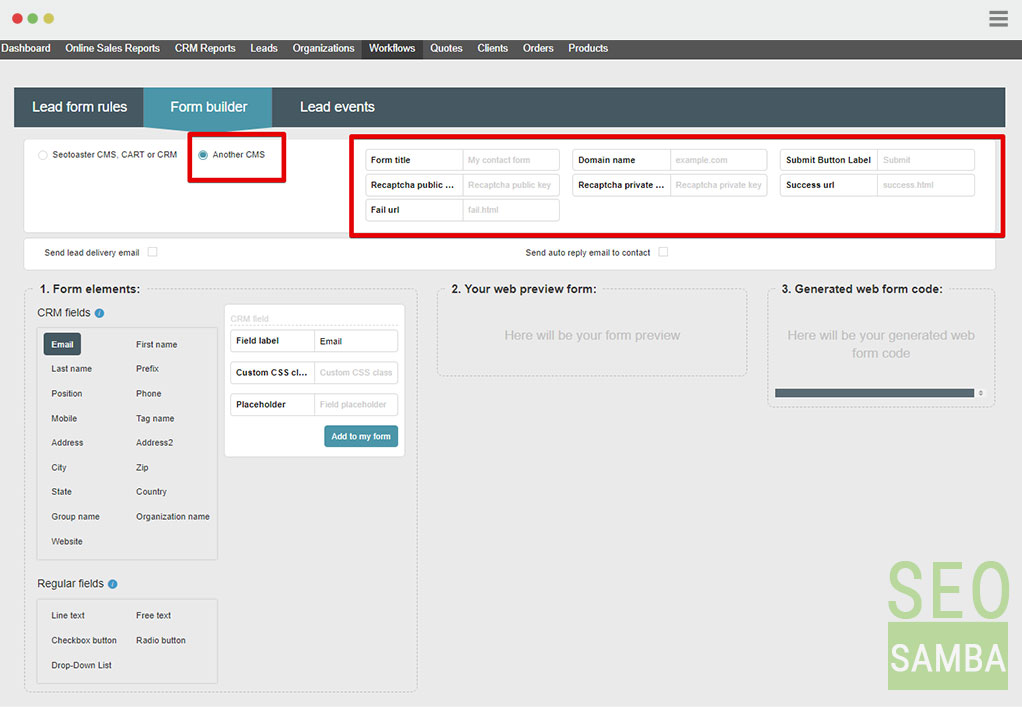
When you get all fields filled, the following procedure will be the same as with the internal forms. Then you can style it as you see fit.
How do I create my email template?
When creating your emails, you can use pre-built templates that come along with the system or it is also possible to create your custom templates like you create the HTML pages.
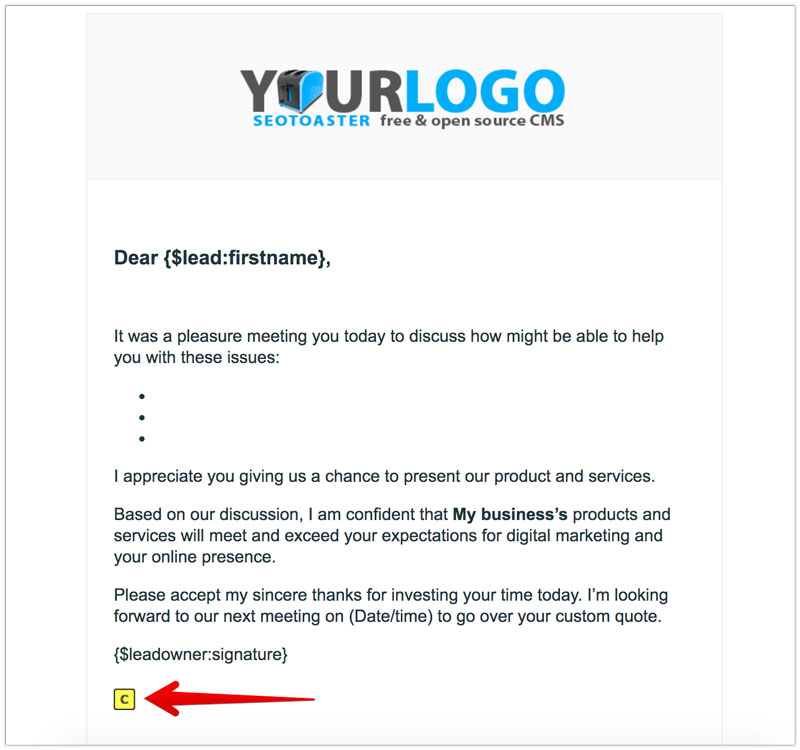
We prepared a set of email templates that can automate your marketing efforts and help you achieve your marketing goals. They can be found in a drop-down menu on the Email tab with "crm-" prefix.
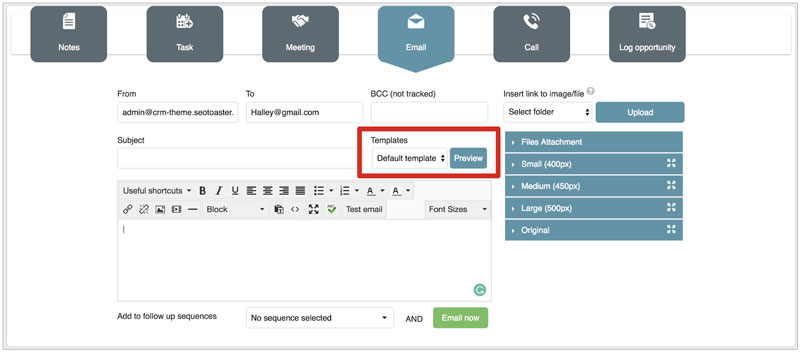
Once you select one of them, the default text will be pre-populated in the email body where you can adjust it according to your needs.
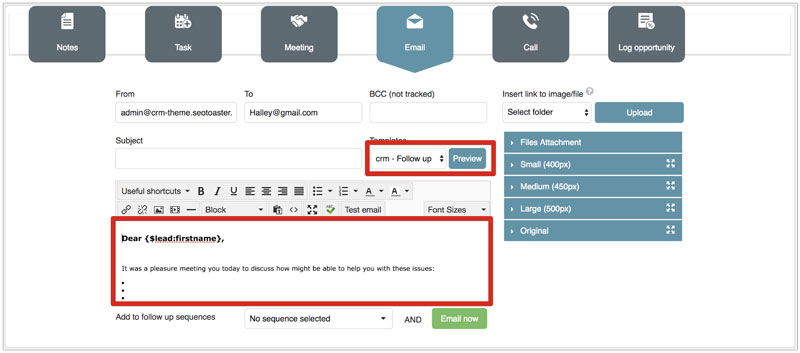
By clicking button, you can see how your email will look like.
If you want to create your own template, it is easier to start with modifying an existing one.
If you're
an admin in the system, just click
and then ![]() icon. Once you edit the text In the popped-up window and
save it, it will be pre-populated in the email body each time you select this template.
icon. Once you edit the text In the popped-up window and
save it, it will be pre-populated in the email body each time you select this template.
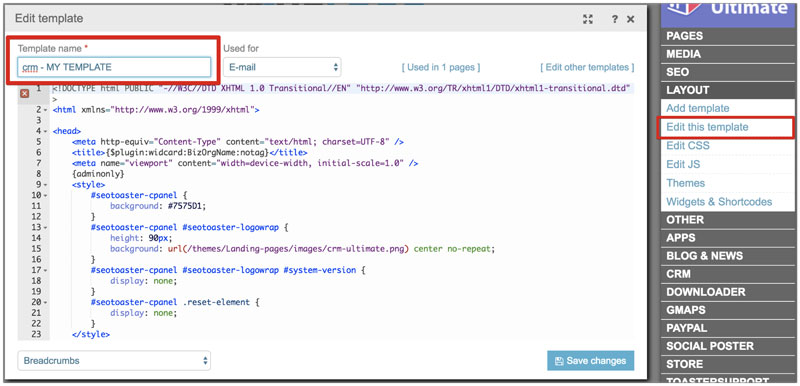
In case you want to rename your email template, on the Preview page, click and then go to LAYOUT / Edit this template on Admin panel and modify the template name.